
Let’s start with that moment when you run your fingers through thinning spots and wonder if there’s a DIY fix that actually works.
If you’ve been scrolling through endless forums, you’ve probably seen “microneedling for hair loss at home” pop up a lot. It sounds like a spa‑level treatment you could DIY in your bathroom, right?
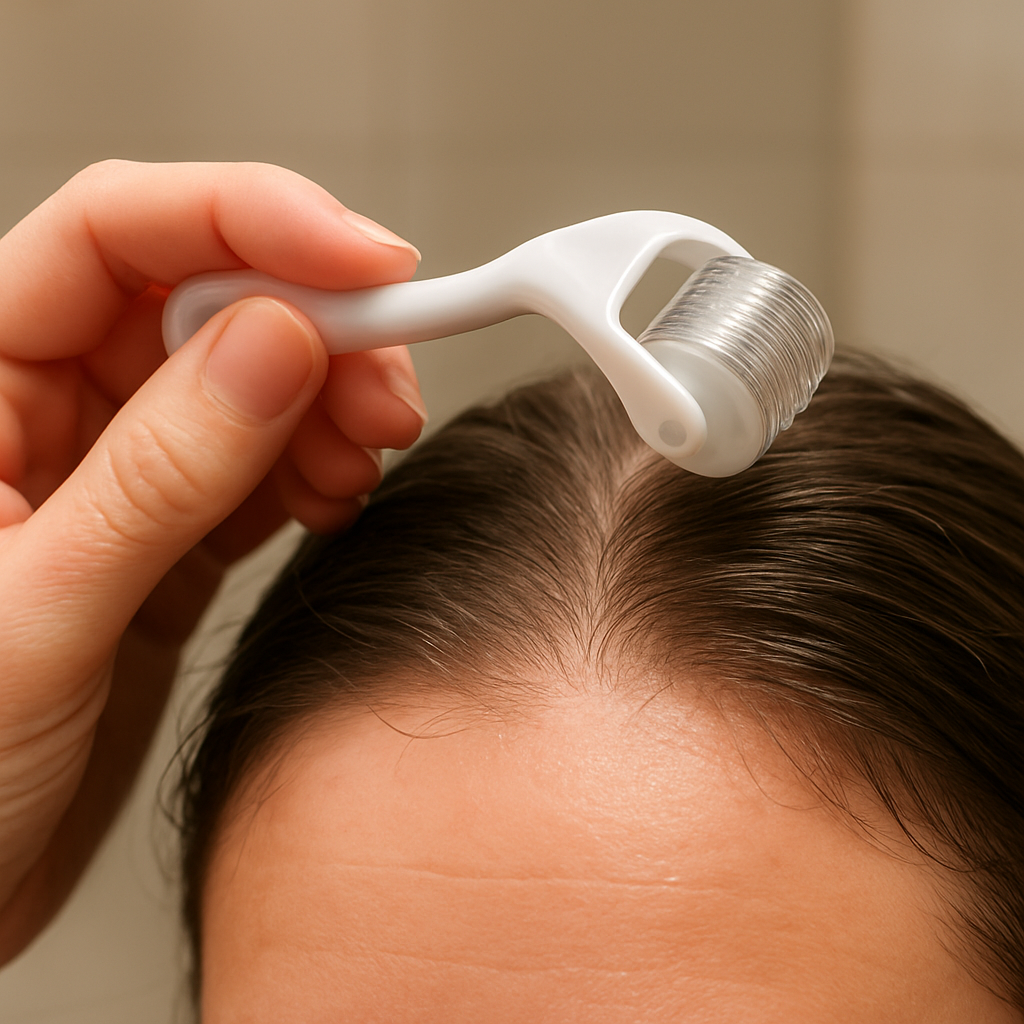
The truth is, the technique is basically a tiny roller covered in needles that creates micro‑injuries on the scalp. Those micro‑injuries trigger the body’s natural healing cascade – more blood flow, collagen production and, importantly, a surge of growth factors that can nudge dormant hair follicles awake.
You might be thinking, “Will this hurt? Will it damage my scalp?” In our experience at Julian Jay we’ve seen clients start with a 0.25 mm device and quickly get used to the gentle tingling. The key is consistency, not intensity – a few minutes twice a week is often enough.
So why does it work when other home remedies fall flat? Unlike shampoos or supplements that sit on the surface, microneedling actually talks to the skin’s deeper layers. It also boosts the absorption of any topical serums you’re already using, and the active ingredients can sink in more effectively.
But there are a few pitfalls to dodge. Over‑doing it can cause irritation, and using a needle length that’s too long may lead to bleeding. Always sanitise the device before and after each session, and give your scalp a day or two to recover.
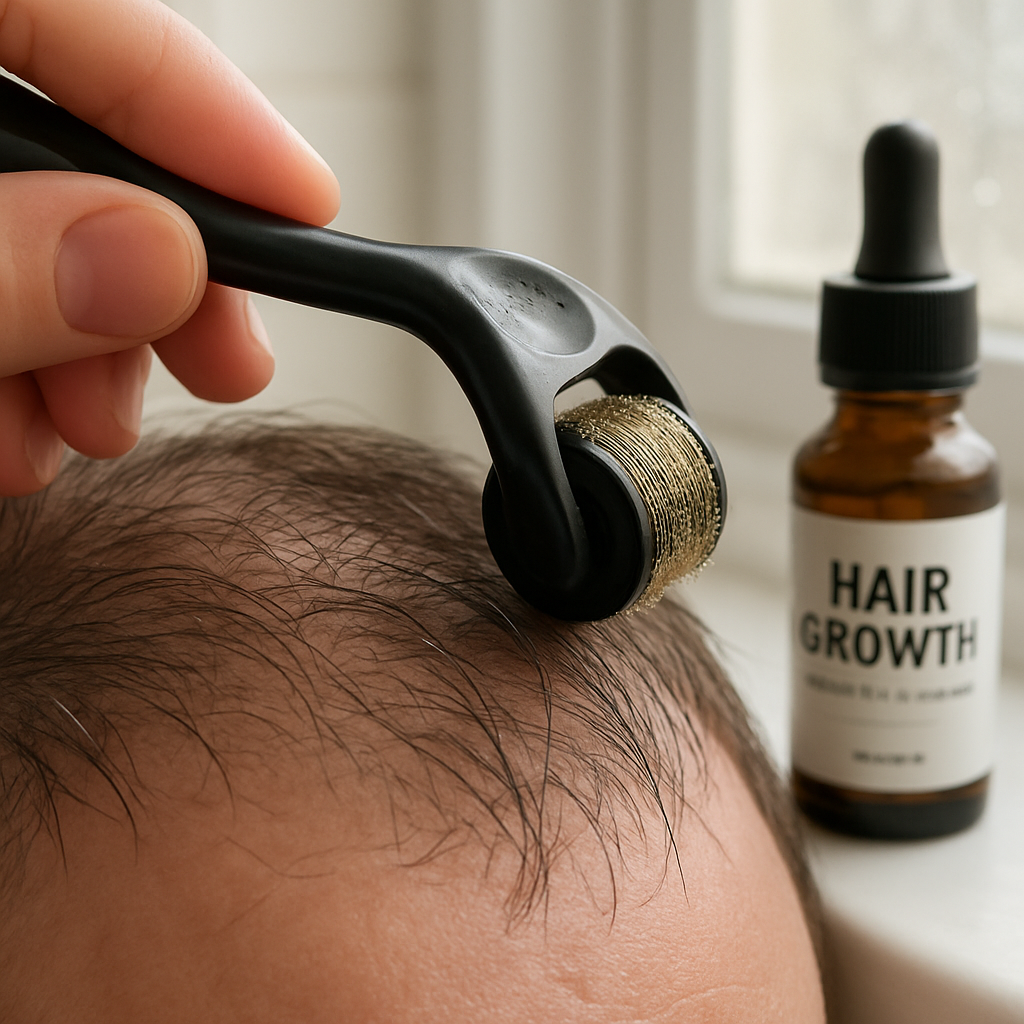
Imagine pairing a 0.5 mm roller with a proven hair growth serum – the kind we recommend at Julian Jay – and watching subtle thickening over a few months. It’s not a miracle overnight, but it’s a realistic, science‑backed step you can take without stepping into a clinic.
Ready to give microneedling for hair loss at home a try? Grab a quality roller, start slow, and track your progress. Let’s dive in and explore how to set it up correctly, what to expect, and how to maximise results.
TL;DR
Microneedling for hair loss at home is a simple, low‑cost method that gently stimulates the scalp, boosts serum absorption and encourages dormant follicles to start growing again.
Do it twice weekly with a 0.5 mm roller, keep it clean, and pair it with a proven growth serum for noticeable thickening within a few months.
Step 1: Prepare Your Scalp and Tools
Before you even roll the microneedle across your crown, you need a clean canvas. Think of it like priming a wall before you paint – a tidy scalp lets the tiny punctures do their magic without irritating an already stressed surface.
First thing’s first: give your scalp a gentle cleanse. Use a mild shampoo, rinse thoroughly, and pat dry. If you like a little extra exfoliation, a light scalp scrub can work wonders. In fact, our Best Scalp Scrub for Hair Growth guide walks you through which ingredients to look for and why they help the microneedles glide smoother.
Now, about the tools. A 0.5 mm dermaroller is the sweet spot for most adults over 30 – it’s long enough to reach the dermis but short enough to avoid bleeding. Make sure the device is made of medical‑grade stainless steel; cheap plastic needles can bend and cause uneven pressure.
Sanitising the roller
Safety first, right? Fill a small bowl with 70% isopropyl alcohol, submerge the roller for about a minute, then let it air‑dry on a clean paper towel. Do this before every session and again after you finish. It’s a tiny habit that keeps infections at bay and preserves the needle integrity.
Do you ever wonder why some people skip this step and end up with irritated patches? Usually it’s because they assumed “it’s just a roller, it can’t get dirty”. Trust us, the micro‑injuries create a perfect doorway for bacteria if you’re not careful.
Preparing your scalp for the needle
Once your scalp is clean and dry, apply a light mist of alcohol‑free toner or a specialised pre‑microneedling spray. This reduces friction and gives you a clearer view of the hairline you’re working on. Avoid anything with fragrance or heavy oils right before you roll – they can make the needles slip.
And here’s a tip many overlook: give your scalp a minute or two to breathe after the mist. That short pause lets the scalp surface settle, meaning the roller will press evenly rather than bouncing around.
Ready to roll? Hold the device with both hands, stretch the hair in the area you’re treating, and roll horizontally, vertically, and diagonally – about 6‑8 passes per zone. You should feel a mild tingling, not sharp pain. If it hurts, you’re either using too much pressure or a needle length that’s too long. Scale back and you’ll be fine.
After you finish, don’t rush to apply serums while the skin is still red. Wait about 10‑15 minutes, then gently pat on your favourite hair‑growth serum. The micro‑channels you just created will let the active ingredients sink deeper, boosting effectiveness.
While the video shows the rolling motion, remember the real work happens in the preparation. A clean scalp, a sterilised tool, and a brief waiting period before serum are the three pillars that keep the process safe and effective.
Lastly, consider supporting your microneedling routine with a holistic health boost. XLR8well offers nutrition plans and supplements that complement hair‑growth protocols, giving your follicles the vitamins they need from the inside out.
Stick to this prep checklist each time, and you’ll create a consistent, low‑risk environment for your hair follicles to awaken. Consistency beats intensity, and a well‑prepped scalp is the foundation for any successful at‑home microneedling programme.
Step 2: Choose the Right Microneedle Device
Now that your scalp is clean and your tools are laid out, the next decision feels a bit like picking the right brush before painting a portrait – the tool shapes the result. The market is flooded with rollers, pens and even “smart” devices, but for microneedling for hair loss at home you really only need two things: the correct needle length and a sturdy, medical‑grade build.
Needle length – the sweet spot for beginners and pros
Most dermatologists agree that 0.25 mm is a gentle entry point. It creates micro‑channels just deep enough to boost serum absorption without causing noticeable bleeding. If you’re over 30 and have been consistent with the shorter roller, you might graduate to 0.5 mm – that’s where you start seeing a modest increase in collagen production on the scalp. Anything longer belongs in a clinic; home‑use needles longer than 0.5 mm raise the risk of irritation and infection.
Material matters – stainless steel, gold‑plated or titanium?
Stainless steel is the baseline – it’s cheap, but the needles can dull after a few dozen rolls. A gold‑plating or titanium‑coating adds a thin protective layer that keeps the points sharper longer and reduces rust, especially in a damp bathroom. A quick glance at a reputable product page, like the one from Hairloving’s derma‑roller, shows exactly how those coatings are marketed for durability and comfort.
Safety features you shouldn’t ignore
Look for a roller with a secure, ergonomic handle. You’ll be pressing gently for a few minutes twice a week, so a slip‑proof grip helps you maintain consistent pressure. Some devices come with a built‑in storage case that locks the head – that’s a subtle but useful way to keep the needles clean between sessions.
What the research says
A review from the Cleveland Clinic notes that microneedling can stimulate hair growth for androgenetic alopecia and alopecia areata, but only when the procedure is performed safely and combined with proven topicals like minoxidil (source). The takeaway? The device alone isn’t a miracle cure; it’s a catalyst that makes your other products work harder.
Quick checklist before you buy
- Needle length: 0.25 mm to start, 0.5 mm if you’re comfortable.
- Coating: gold‑plated or titanium‑coated for longevity.
- Handle: non‑slip, ergonomic, preferably with a storage cap.
- Brand reputation: look for medical‑grade claims and clear sterilisation instructions.
- Price vs. usage: a decent home device costs £20‑£35 and should last 30‑40 sessions before you need a replacement.
Cleaning your roller after every session is as important as the roll itself. Rinse the head under warm water, then soak it in 70 % isopropyl alcohol for two minutes. Let it air‑dry on a clean paper towel before popping it back into its protective cap. Skipping this step can introduce bacteria, which not only ruins the treatment but can also cause scalp infections – something no one wants after a relaxing evening routine. As a rule of thumb, replace the device after 30‑40 uses; the needles lose their sharpness and the micro‑channels become less consistent.
When it comes to how often you should roll, less is more. Most dermatologists recommend two sessions per week, spaced at least 48 hours apart, to give the scalp time to heal. Over‑rolling can trigger inflammation, which paradoxically slows hair growth. Pair each session with a proven hair‑growth serum – the micro‑channels you create act like tiny doors, letting the active ingredients sink deeper where they can do the most good.
Imagine you’re standing in front of the bathroom mirror, roller in hand, and you feel confident because you’ve checked each item on this list. That confidence translates into steadier pressure, fewer missed spots and, ultimately, better results.
Once you’ve chosen the right device, the next step is mastering the rolling technique – pressure, pattern and timing. We’ll walk through that in the following section, but for now, make sure your roller checks all the boxes above.
Step 3: Compare Needle Lengths and Treatment Frequency
Alright, you’ve got the roller, you’ve prepped the scalp – now the real question is “how long should those needles be and how often should I roll?” It’s a bit like choosing a coffee grind: too fine and you’re just tasting water, too coarse and you’re left with a bitter mess.
In the world of at‑home microneedling, the sweet spot usually sits between 0.25 mm and 0.5 mm. Those lengths stay in the epidermis, so they’re gentle enough for most folks over 30 and they open up micro‑channels that let your favourite hair‑growth serum sink deeper.
But if you’re feeling a little more adventurous – and your scalp tolerates it – the research points to 1.5 mm as the threshold where you actually start poking the dermis, where the hair‑follicle stem‑cell bulge lives. That’s the layer that can trigger a real growth‑factor surge, albeit with a higher chance of mild redness or pinpoint bleeding.
What the science says
A systematic review on Perfect Hair Health notes that studies using 1.5 mm to 2.5 mm needles showed the biggest hair‑count gains, roughly a 15 % uplift on average. Shorter needles (0.25–0.5 mm) still help – mainly by boosting topical absorption – but they don’t stimulate the deeper follicle stem cells as robustly.
Verywell Health adds that frequency matters just as much as length. Too many sessions can overwhelm the scalp’s natural healing window, leading to irritation or infection. Most dermatologists recommend spacing sessions 48–72 hours apart, which translates to two‑to‑three rolls a week for the shorter needles and once a week for the longer ones.
Quick decision table
| Needle Length | What you get | How often |
|---|---|---|
| 0.25 mm | Improves serum uptake; minimal discomfort | 2‑3 times / week |
| 0.5 mm | Better collagen boost; still mostly epidermal | 2 times / week |
| 1.5 mm | Targets dermal stem‑cell bulge; noticeable redness | 1 time / week |
So, which column looks most like you? If you’re just starting out or have a sensitive scalp, the 0.25 mm option lets you roll without fear of bleeding. Pair it with a proven growth serum and you’ll notice the product sinking in better – think of it as opening a tiny door for the active ingredients.
If you’ve been consistent for a few months and your scalp feels “used to it”, stepping up to 0.5 mm can give you that extra collagen nudge without dramatically raising the risk of bruising. Just keep the two‑sessions‑per‑week rhythm and watch the texture improve.
For the truly committed – the ones who have tracked progress with photos and are ready for a more aggressive approach – 1.5 mm is the only length that consistently reaches the follicle bulge. Because the needles go deeper, you’ll need to give the skin more recovery time: one session per week, then a day or two of gentle care (no harsh shampoos, just a light cleanse).
One practical tip: after a 1.5 mm roll, apply a calming, peptide‑rich serum and avoid heat styling for at least 24 hours. The scalp will be a little more sensitive, and you don’t want to undo the micro‑injury you just created.
And remember, the numbers aren’t set in stone. Some users find that a 0.6 mm roller, used twice a week, feels like a happy medium – it’s still in the epidermis but gives a slightly stronger stimulus. If you experiment, keep a simple log: date, needle length, how your scalp felt, and any visible change. After four‑to‑six weeks you’ll have enough data to decide whether to stay, step up, or step back.
Bottom line: match the needle length to how much your scalp can comfortably heal, and let the frequency respect that healing window. Consistency, not intensity, is the secret sauce for sustainable hair‑growth gains at home.
Step 4: Perform the Microneedling Procedure
Alright, you’ve got your scalp prepped and the right roller in hand – now it’s time to actually roll.
First, sit in a well‑lit chair where you can see the crown without straining. If you’re nervous, place a clean towel over your shoulders; it catches any tiny drops and keeps the bathroom tidy.
Set your roller to a comfortable grip. The pressure rule of thumb is “light‑touch, no‑pain”. Imagine you’re massaging a sore calf – you want a gentle press, not a nail‑scratch. If you’re unsure about the exact hand‑movement, check out this demonstration video. Press the roller against the scalp and glide it in a straight line for about three seconds, then lift and repeat.
Work in sections. Start at the front hairline, roll horizontally from left to right, then back‑to‑front, covering the same strip twice. Drop down a centimetre and repeat across the whole scalp. This criss‑cross pattern – horizontal, vertical and diagonal – ensures the micro‑channels overlap, maximising serum uptake.
A typical session lasts 5‑7 minutes. For 0.25 mm, two passes per area are enough; for 0.5 mm you might add a third pass if your scalp tolerates it. Keep a timer handy so you don’t linger and cause unnecessary irritation.
But what if you feel a tingle or a tiny pinprick? If that happens, simply ease up on the pressure – you should feel a mild buzzing, not sharp stabbing. Switch to the lighter 0.25 mm head for the next session and let the skin fully recover.
Once you’ve covered the scalp, wipe the roller head with a fresh alcohol swab – you’ve just created a field of micro‑injuries and you don’t want any leftover skin debris to sit on the needles for the next use.
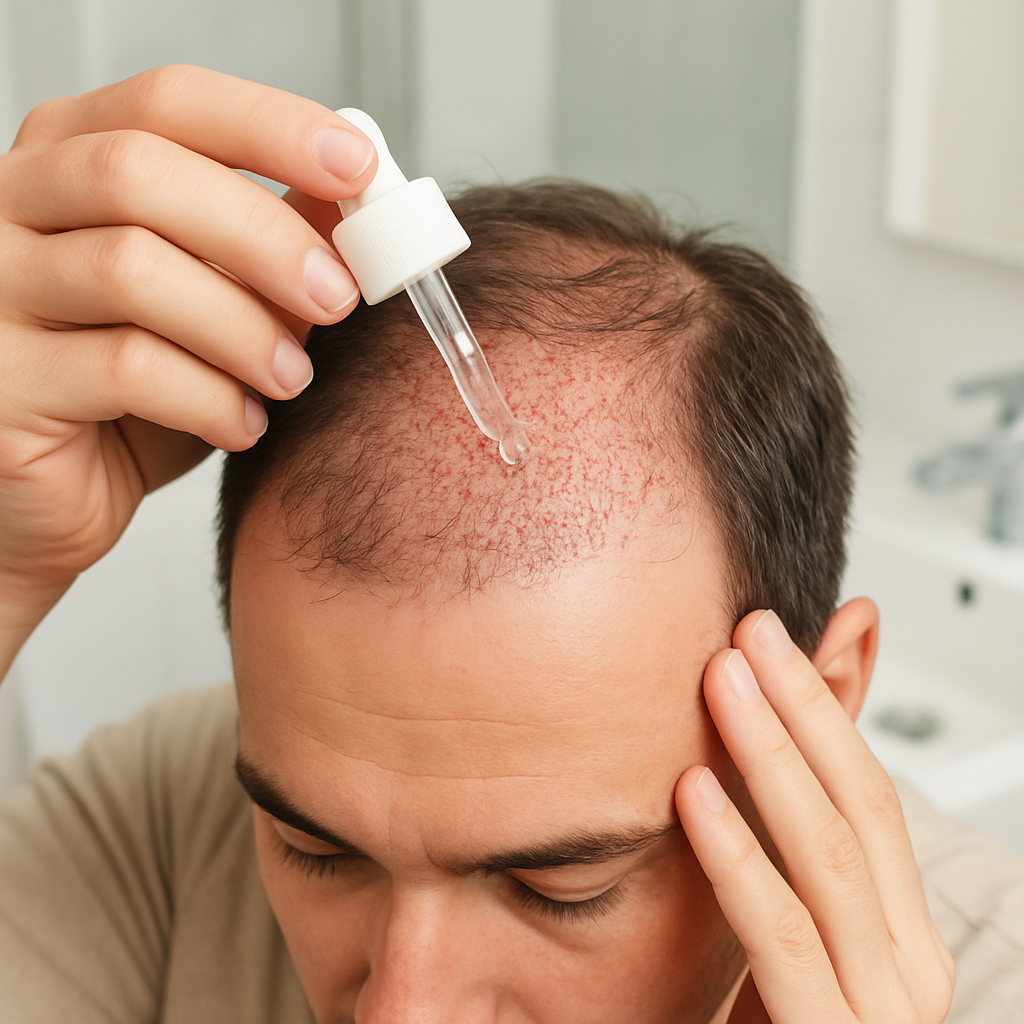
Now comes the serum step. While the skin is still slightly pink, apply a few drops of your favourite hair‑growth serum – the one we recommend at Julian Jay contains peptides and hyaluronic acid. Gently massage it in with your fingertips; the micro‑channels act like tiny doors, letting the actives sink deeper than they ever could on untouched skin.
After serum, give the scalp a breather. Avoid heat tools, tight hats or vigorous scratching for at least 24 hours. A cool, damp towel can soothe any redness, and a lightweight, silicone‑based leave‑in conditioner can keep the area hydrated without clogging pores.
Track your progress. Grab a small notebook or use a phone note and log: date, needle length, pressure level (light, medium, firm), any redness, and a quick visual rating of hair density. After four weeks you’ll start spotting patterns – maybe 0.5 mm twice a week yields the best thickness, or perhaps you need an extra rest day.
Real‑world example: Sarah, a 42‑year‑old accountant, started with 0.25 mm twice a week. After six weeks she felt a mild tingling but no visible change. She upgraded to 0.5 mm, kept the same schedule, and by week 10 reported noticeably thicker strands along her temples. The key was the consistent criss‑cross technique and post‑roll serum.
Another case: Mark, 38, prefers a single weekly session with a 1.5 mm roller because he’s comfortable with a deeper stimulus. He pairs it with a calming peptide serum and skips styling for a day. After three months his shedding reduced and new micro‑follicles appeared on the crown. His secret? strict hygiene – sterilising the roller before and after every use and replacing it after 35 rolls.
Tip from the lab: if you notice persistent redness beyond 48 hours, dial back the frequency or switch to a shorter needle. Over‑rolling can trigger inflammation, which actually stalls hair growth.
Finally, a quick checklist to run through before you finish each session: scalp slightly damp, roller sterilised, light pressure, criss‑cross pattern completed, serum applied, tools stored in the original case.
Stick to this routine, listen to your scalp, and you’ll give your follicles the gentle shock they need to wake up.
Step 5: Post‑Treatment Care and Product Boosters
After you’ve rolled, the real magic starts when you treat the fresh micro‑channels with the right after‑care. If you’ve ever felt that tiny pink after‑glow and thought, “What now?” you’re not alone – we’ve all been there.
First thing’s first: give your scalp a moment to breathe. Keep the area slightly damp for the next five minutes; that tiny layer of moisture lets the needles glide a bit more gently and reduces that post‑roll sting.
Now, reach for a serum that actually talks to the skin. Our favourite? A growth‑factor‑rich serum that contains hyaluronic acid and, if you can splurge a little, a stem‑cell‑conditioned formula like the one from AnteAGE’s home microneedling solution. The hyaluronic acid plumps the upper layers, while the growth factors signal your follicles to kick into repair mode.
Step‑by‑step post‑roll routine
1. Pat‑dry, don’t rub. Gently blot excess water with a soft towel – you don’t want to drag the needles.
2. Apply serum within two minutes. The micro‑channels close fast, so timing matters. Use three to four drops, massage in circular motions, and let it soak for a minute.
3. Lock in moisture. A lightweight, botanical‑rich oil (think rosemary or argan) works as a sealant, keeping the serum from evaporating too quickly.
4. Avoid heat and friction. No blow‑dryers, no tight hats, and no intense workouts for at least 24 hours. Your scalp is more porous – think of it as a fresh wound that needs gentle care.
5. Sanitise your tools again. A quick dip in 70 % isopropyl alcohol before storage prevents any lingering bacteria from setting up shop.
Boosters that really move the needle
Besides the serum, there are a few product categories that act like a turbo‑charger for the healing response.
• Peptide‑rich hair growth serums. Peptides mimic the body’s own signalling molecules, nudging dormant follicles awake. Look for ingredients like copper‑peptide or hexapeptide‑11.
• Minoxidil. If you’re already on a minoxidil regimen, the micro‑channels dramatically improve its absorption. Just wait until the serum has dried before you dab on the minoxidil solution.
• Vitamin‑C or antioxidant boosters. A light spray of vitamin‑C serum can combat any oxidative stress that pops up after the micro‑injury.
One reader told us they paired the AnteAGE serum with a daily rosemary oil massage and saw a subtle thickening after six weeks – not a miracle, but enough to feel hopeful.
Wondering how often you should repeat the booster routine? In the first month, aim for once‑a‑week post‑roll applications. As your scalp builds tolerance, you can move to twice‑a‑week – but never more than three times in a seven‑day span. Over‑doing it can actually dampen the healing cascade.
Need a deeper dive into after‑care best practices? The Dr Pen after‑care guide walks you through everything from exfoliation timing to sun protection.
Quick post‑roll checklist
- Scalp still slightly damp?
- Serum applied within two minutes?
- Light oil sealant added?
- No heat or tight gear for 24 hrs?
- Roller sterilised and stored?
Cross‑checking this list after each session is a tiny habit that pays big dividends. Your scalp will thank you with less redness, faster healing, and, over time, a bit more density.
And remember – consistency beats intensity. Stick to the routine, listen to any tingling or redness, and adjust frequency if your scalp feels overwhelmed. In a few months, you’ll start noticing those stubborn thinning spots looking a shade fuller.
Step 6: Track Progress and Adjust Your Routine
So you’ve been rolling, you’ve been feeding the scalp with serum, and you’re wondering whether all this effort is actually moving the needle. Trust me, you’re not alone – most of us need a bit of evidence before we can convince the inner critic that the process works.
Why tracking matters
Microneedling for hair loss at home isn’t a magic wand; it’s a catalyst that nudges your follicles back into growth mode. The only way to know if you’re nudging in the right direction is to capture data, just like you’d log reps at the gym. A simple log helps you spot patterns, avoid over‑rolling, and keep motivation high when you start seeing those tiny strands pop up.
What to record
Grab a notebook, a spreadsheet, or a notes app – whatever feels least like a chore. Here’s the core data set you should capture after each session:
- Date & time – helps you see the spacing between rolls.
- Needle length used (0.25 mm, 0.5 mm, etc.).
- Pressure level (light, medium, firm). You can rate it 1‑3.
- Scalp reaction – any redness, tingling, or itching? Note duration.
- Serum applied – name and any changes you made.
- Visual rating – give the area a quick 1‑5 score for perceived density.
Adding a quick before‑and‑after photo every two weeks gives you a visual timeline you can’t argue with.
Real‑world example
Take Laura, a 38‑year‑old teacher from Manchester. She started with a 0.25 mm roller twice a week, logged everything, and after three weeks noticed mild redness lasting 48 hours. Her log showed she’d been applying a firm pressure. She dialed back to a lighter touch and added a calming peptide serum. By week 8, the redness vanished and her visual rating jumped from 2 to 3. The data convinced her to stay the course rather than quit in frustration.
When to adjust frequency
If you see consistent redness lasting more than two days, or the scalp feels sore for longer than 24 hours, it’s a sign you’re over‑rolling. Drop back to once every 72 hours or switch to the shorter 0.25 mm needle for a week. Conversely, if your logs show minimal reaction and the visual rating is stuck at 2 after a month, you might safely increase to three sessions a week – but never exceed three rolls in any seven‑day period.
Remember, the scalp needs a healing window. Studies on microneedling for hair loss suggest a 48‑72 hour recovery period is optimal for collagen synthesis and growth‑factor release.APDerm explains how stressors can disrupt this cycle, so keeping the rhythm right is key.
Adjusting the serum game
Sometimes the tool isn’t the issue – the post‑roll product is. If you’re using a serum that feels heavy or causes irritation, swap it for a lighter hyaluronic‑acid based formula for a week and note any change in scalp comfort. You might also experiment with adding a few drops of rosemary oil on the days you feel the scalp is particularly dry; just log the addition so you can correlate results.
Quarter‑year checkpoint
Every 12 weeks, sit down with your log and answer these questions:
- Has my visual density score improved?
- Do I need to tweak needle length or pressure?
- Is my serum still the best choice?
If the answer to the first is “yes, but only a little,” celebrate the progress and keep the routine. If it’s “no change,” consider a brief break of a week, then restart at a lower intensity or consult a dermatologist for adjunct therapies like minoxidil.
Quick adjustment checklist
- Redness >48 hrs? Reduce frequency or needle length.
- Scalp soreness >24 hrs? Lighten pressure, add calming serum.
- No density change after 8 weeks? Try a 0.5 mm needle or introduce minoxidil.
- Serum irritation? Switch to a gentler formula, log the swap.
Tracking isn’t just about numbers – it’s about listening to your scalp like a conversation. When you see a pattern, you can act before irritation spirals or before you plateau. That proactive tweaking turns a DIY routine into a personalised hair‑growth protocol.
Bottom line: a habit of logging, reviewing, and tweaking keeps your microneedling journey on track, turning those tiny micro‑channels into a steady pipeline for new hair. Grab that notebook, start noting, and watch your confidence grow alongside your follicles.
FAQ
What exactly is microneedling for hair loss at home and how does it work?
Microneedling is a DIY scalp‑micro‑injury technique where a roller with tiny, medical‑grade needles creates thousands of micro‑channels in the skin. Those channels stimulate collagen production and, more importantly for us, improve the absorption of hair‑growth actives. Think of it as opening a floodgate – the serum you apply afterwards can reach the follicle stem cells much more efficiently, nudging dormant hairs back into the growth phase.
How often should I roll and which needle length is safest for beginners?
For most people over 30, a 0.25 mm roller twice a week is the sweet spot. It’s long enough to boost serum uptake but short enough to avoid noticeable bleeding. If your scalp feels comfortable after a month, you can graduate to a 0.5 mm device, still keeping the two‑sessions‑per‑week rhythm. Anything longer belongs in a clinic – the risk of irritation spikes dramatically.
Do I need a special serum after rolling, and can I use minoxidil?
Yes – the post‑roll serum is the real game‑changer. A lightweight, peptide‑rich formula with hyaluronic acid works well because it sinks into the fresh micro‑channels without clogging pores. If you’re already on minoxidil, apply it after the serum has dried; the microneedle‑created pathways dramatically improve its penetration. Just avoid heavy, oil‑based products right after rolling – they can block the channels.
What signs tell me I’m over‑rolling or need to adjust my routine?
Redness that lasts more than 48 hours, persistent tingling, or soreness beyond a day are warning lights. Those symptoms mean you’re stressing the scalp faster than it can heal. Drop back to once every 72 hours, or switch to the shorter 0.25 mm head for a week. Keep a simple log – date, needle length, pressure, and reaction – so patterns become crystal clear.
How long before I see any improvement?
Patience is key. Most folks notice a subtle reduction in shedding after 4–6 weeks, and visible thickening usually appears around the 10‑12 week mark. Remember, hair grows at roughly a centimetre per year, so any new strand will start out fine and thin before it matures. Stick to the schedule, track your progress, and you’ll start seeing those tiny density gains stack up.
Can I combine microneedling with other treatments like red‑light therapy or ketoconazole shampoo?
Absolutely – they complement each other nicely. Red‑light therapy boosts cellular metabolism, while ketoconazole shampoo tackles scalp inflammation and DHT buildup. Use microneedling on its own days, red‑light on alternate evenings, and keep the shampoo in your regular wash routine. Just give the scalp a 24‑hour breather between any two active treatments to avoid overstimulation.
How do I keep my roller sanitary and when should I replace it?
Sanitation is non‑negotiable. Soak the roller in 70 % isopropyl alcohol for at least two minutes before and after every session, then let it air‑dry on a clean paper towel. Store it in its original capped case, away from humidity. Needles lose their edge after roughly 30‑40 rolls; when you notice more resistance or reduced redness, it’s time for a fresh device.
Conclusion
So, you’ve walked through everything from picking the right roller to logging your results. At the end of the day, microneedling for hair loss at home works best when you treat it like a simple habit rather than a miracle cure.
Remember the three pillars: clean tools, gentle pressure, and consistent follow‑up serum. If any of those slip, the scalp will thank you with redness or stalled growth.
What’s the next step? Grab your sterilised roller, set a calendar reminder for two‑to‑three sessions a week, and jot down a quick note after each roll – needle length, how your scalp feels, and a tiny visual rating. Those tiny data points become a roadmap that shows you where to tweak frequency or upgrade to a 0.5 mm head.
And don’t forget the little things that make a big difference: a cool towel after a session, a light peptide serum, and swapping out the roller after 30‑40 uses. Those details keep the process painless and sustainable.
In a few months you’ll start seeing those subtle density gains stack up, and the confidence boost will be worth every minute you spend in front of the mirror. Keep listening to your scalp, stay consistent, and let the micro‑channels do the heavy lifting.