
Ever stared at your mirror, wondering why your hair feels stuck on the scalp, like it’s refusing to grow?
Maybe you’ve tried shampoos, oils, even that pricey serum, yet the shedding keeps coming back like an unwanted guest.
Here’s the thing: the surface of your scalp can get clogged with dead skin, product build‑up and tiny bits of sebum, and that barrier stops fresh nutrients from reaching the follicles.
That’s where scalp exfoliation for hair growth steps in – a gentle, almost therapeutic swipe that sweeps away the grime and makes space for new growth.
Think of it like spring cleaning for your head; you wouldn’t keep dust piling up in a living room and expect fresh air to flow, right?
When you regularly exfoliate, you’re not just polishing the surface, you’re encouraging blood circulation and signalling the hair follicles that it’s safe to do their job.
And the best part? You don’t need a fancy salon chair. A simple scrub or a DIY sugar‑salt mix can do the trick, especially when paired with a product line that’s designed to soothe and nourish, like Julian Jay’s Complete Hair Growth Treatment Kit.
Imagine the feeling of a cool, tingling brush on your scalp, followed by that satisfying rinse – it’s oddly satisfying, like a mini‑massage that wakes up your nerves.
So, if you’ve been frustrated by slow growth or random thinning patches, ask yourself: what if the missing piece is simply a clearer scalp?
In the next sections we’ll break down how to choose the right exfoliator, the safest frequency, and a step‑by‑step routine that fits into a busy morning.
We’ll also look at common mistakes – like over‑scrubbing or using harsh chemicals – that can actually set you back.
By the end, you’ll have a practical game‑plan that turns scalp exfoliation from a buzzword into a real, noticeable boost for your hair.
Let’s dive in and give your follicles the fresh start they’ve been waiting for.
TL;DR
Scalp exfoliation for hair growth clears clogged pores, boosts circulation, and creates a fresh environment where follicles can thrive naturally.
Combine a gentle scrub or sugar‑salt mix with Julian Jay’s Complete Hair Growth Treatment Kit, and you’ll notice less shedding, thicker strands, and a scalp that feels refreshed after each wash.
Step 1: Understand Scalp Exfoliation Basics
First things first – what exactly is scalp exfoliation and why does it matter for hair growth? In simple terms, it’s the process of gently removing dead skin cells, excess sebum and product residue that build up on the surface of your scalp. Think of it as a mini‑spa for the skin beneath your hair, clearing the way for nutrients to reach each follicle.
When those tiny pores stay clogged, blood flow is restricted and the follicles can’t “breathe”. That’s why you might notice more shedding or slower growth, even if you’re using the best shampoos. By exfoliating, you create a clean canvas – kind of like wiping a foggy mirror before you look at yourself.
How does it actually work?
The physical action of a scrub or a chemical exfoliant (like gentle AHAs) loosens the bond between dead cells and the scalp. As you massage the product in, you also stimulate circulation. The gentle pressure sends a signal to the brain that it’s time to increase blood flow, delivering oxygen and nutrients straight to the hair roots.
That little boost in circulation is one of the main reasons experts link scalp exfoliation to hair growth. It’s not magic, but it’s a sensible, low‑cost way to support the biology of hair production.
What ingredients should you look for?
Common DIY options include a sugar‑salt mix, oatmeal, or a fine‑grained scrub made from ground coffee beans. In the market, you’ll see products that feature salicylic acid, glycolic acid, or enzymes like papain. All of these work by breaking down the glue that holds dead skin together.
For a gentle at‑home routine, a DIY sugar‑salt blend (equal parts, mixed with a splash of your favourite conditioner) is a safe bet. It’s abrasive enough to do the job without irritating sensitive skin.
And if you prefer a ready‑made option, look for an exfoliating shampoo that mentions “micro‑beads” or “smooth polishing particles”. Just avoid anything that feels gritty like a kitchen scrub – the scalp is delicate.
Here’s a quick checklist to decide if you’re ready to start:
- Scalp feels oily or itchy more than usual.
- You notice a thin layer of flakes that won’t wash away.
- Hair seems to shed more heavily after washing.
If you tick any of those boxes, scalp exfoliation could be the missing puzzle piece.
One fun way to make the routine feel like a self‑care ritual is to pair it with a calming drink afterwards. I love winding down with a cup from Chilled Iguana Coffee Co – the cool, smooth flavour mirrors the fresh feeling on my scalp.
When you watch the short video above, you’ll see a step‑by‑step demo of a simple sugar‑salt scrub. Pause it, grab your ingredients, and follow along – it only takes a minute or two.
To wrap up this first step, remember that consistency beats intensity. Start with once a week, observe how your scalp reacts, and then adjust. Over‑scrubbing can irritate, so listen to the signals your skin sends. In the next section we’ll dive into choosing the right product for your hair type and how to pair exfoliation with Julian Jay’s Complete Hair Growth Treatment Kit for maximum benefit.
Step 2: Choose the Right Exfoliation Method
Now that you know why scalp exfoliation matters, the next question is – which method actually works for you? The answer isn’t one‑size‑fits‑all; it depends on your scalp type, lifestyle, and how much time you want to spend each week.
Physical (scrub‑based) exfoliants
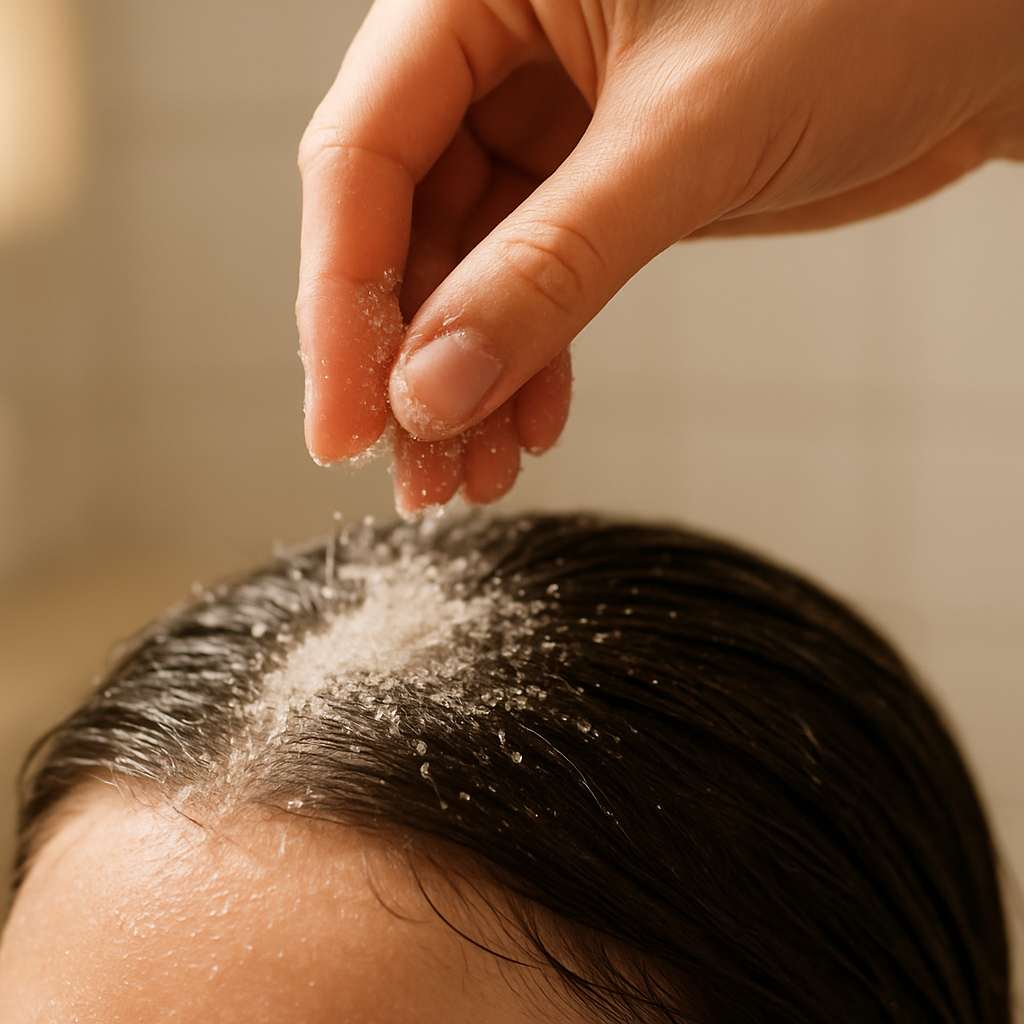
Physical exfoliants rely on tiny grains or beads that you massage into a wet scalp. Think of a gentle sugar‑salt mix or a commercial scrub that lists “apricot seed” or “sea salt” as the first ingredient. When you move in circular motions, those particles create friction that lifts dead skin cells and excess sebum.
Real‑world example: Sarah, a busy graphic designer, swapped her usual shampoo for a DIY brown‑sugar‑oatmeal scrub once a week. Within three weeks she noticed her hair felt lighter and her usual “post‑wash itch” had faded. The key was keeping the pressure light – you want a pleasant tingle, not a sore scalp.
Pro tip: always rinse with lukewarm water. Hot water can strip natural oils and make the scalp over‑produce oil, undoing the benefits.
Chemical (enzyme or acid‑based) exfoliants
Chemical exfoliants use ingredients like salicylic acid, glycolic acid, or fruit enzymes to dissolve the bonds between dead cells. You don’t feel the gritty texture, but the result is a smoother surface. This route is great for people who find physical scrubs too harsh or who have sensitive skin.
Take James, a runner who battles occasional dandruff. He introduced a salicylic‑acid scalp serum twice a month. After a month his flakiness dropped dramatically and his hair felt “breathable.” The science behind it is backed by Healthline’s guide to scalp exfoliation, which notes that chemical exfoliants can be used safely once or twice a week.
When using a chemical product, follow the label’s timing instructions – most leave‑on masks work for 5‑10 minutes before you rinse.
DIY recipes you can whip up in minutes
If you love a hands‑on approach, here are two quick formulas:
- Brown sugar & oatmeal scrub: Mix 2 tbsp fine brown sugar, 1 tbsp finely ground oatmeal, and a splash of jojoba oil. Apply to a damp scalp, massage gently, rinse.
- Aspirin‑salicylic acid paste: Crush two plain aspirin tablets, add a few drops of tea tree oil, and thin with water. Use a soft toothbrush to apply, scrub lightly, then rinse thoroughly.
Both recipes give you control over fragrance and texture, and you can adjust the ratio if you feel it’s too abrasive.
How to pick the right method for you
Ask yourself these quick questions:
- Do you have a sensitive scalp that reddens easily? Lean toward chemical or ultra‑fine sugar scrubs.
- Do you enjoy a spa‑like ritual with tactile feedback? Physical scrubs are satisfying.
- How often can you realistically fit it into your routine? Physical scrubs are forgiving once a week; chemical treatments may need a stricter schedule.
Once you decide, test the method for two weeks and note any changes – less itch, a lighter feel, or even a subtle increase in volume.
After you’ve finished exfoliating, seal in the benefits with a nourishing post‑treatment. Our favourite partner is the Complete Hair Growth Treatment Kit, which delivers moisture and nutrients right where the follicles need them.
Remember, consistency beats intensity. A gentle weekly routine will keep your pores clear without triggering the scalp’s “panic mode” that leads to excess oil production.
Looking for extra motivation? Many fitness enthusiasts swear by a clean scalp as part of their overall performance prep – check out Fitness and Wellness Starts Here for more on how scalp health ties into overall vitality. And if you’re into recovery tools, FitCore Supply offers portable massagers that can double‑purpose as a soothing post‑exfoliation scalp massage.
Step 3: Prepare Your Scalp and Tools
Alright, you’ve picked a method – now it’s time to get your scalp ready and gather the right tools. Think of it as setting the stage before the main act; if the stage is messy, the performance will suffer.
1. Cleanse before you exfoliate
Start with a gentle shampoo that removes surface oil and product build‑up. You don’t need anything fancy – just a mild, sulfate‑free cleanser that won’t strip the natural moisture. Rinse with lukewarm water; hot water can over‑activate sebum production, which defeats the purpose of the cleanse.
Do you ever feel that sticky film after a workout? That’s exactly what you want to wash away before you introduce any exfoliating particles.
2. Choose the right tool for the job
Here’s a quick cheat‑sheet of the most common tools and why they matter:
| Tool / Ingredient | Purpose | How to Use |
|---|---|---|
| Fine sea‑salt + brown sugar mix | Physical abrasion to lift dead cells | Massage gently on damp scalp for 30‑45 seconds, then rinse. |
| Salicylic‑acid scalp serum (e.g., a chemical exfoliant) | Dissolves bonds between dead cells without grit | Apply to dry scalp, leave 5‑10 minutes, rinse with cool water. |
| Luxury pre‑treatment exfoliator (e.g., Black Baccara scalp exfoliator) | Combines fine enzymes with antioxidant oils for a spa‑like experience | Dispense a pea‑size amount, massage in circular motions for 1 minute, rinse thoroughly. |
Notice the pattern? Each option gives you a way to clear clogged pores, but the level of “feel” varies – from gritty to silky.
3. Prep your hands and accessories
Wash your hands first. A clean pair of fingers ensures you’re not re‑introducing bacteria while you’re massaging. If you prefer a brush, pick a soft‑bristle scalp brush – nothing metallic that could scrape.
And here’s a pro tip: wrap a thin microfiber towel around the brush handle. It gives you a better grip and prevents the brush from slipping when your scalp gets slippery.
4. Set the environment
Warm, steamy water opens up the pores, making the exfoliation more effective. Let the water run for a minute before you start, then switch to lukewarm for the actual massage. Avoid scorching water – it can cause redness and irritation.
Do you have a favourite bathroom playlist? Put it on. The rhythm helps you keep the motions consistent and turns a routine into a mini‑ritual.
5. Timing is everything
Most experts recommend once a week for physical scrubs and once every two weeks for chemical serums. Over‑doing it can irritate the scalp and trigger that dreaded “panic mode” where it produces more oil.
So, what should your timeline look like? Here’s a simple checklist:
- Day 1: Cleanse, exfoliate, rinse.
- Day 2‑6: Keep the scalp moisturised with a lightweight leave‑in.
- Day 7: Repeat the cleanse‑exfoliate cycle.
If you notice any persistent redness or itching beyond 24 hours, dial back the frequency or switch to a gentler ingredient.
6. Finish with a post‑treatment boost
After rinsing, gently pat the hair dry with a soft towel – no vigorous rubbing. Then, apply a nourishing serum or the Julian Jay Complete Hair Growth Treatment Kit to seal in moisture and feed the follicles.
Think of it as the after‑shave balm for your scalp; it calms, hydrates, and locks in the benefits of the exfoliation.
Ready to give your scalp the fresh start it deserves? Grab your chosen tool, set a timer, and treat your head like the spa you’ve always wanted it to be.
Step 4: Perform the Exfoliation Process Safely
Alright, you’ve prepped the scalp, you’ve got your favourite exfoliant in hand – now it’s time to actually do the work without turning your head into a battlefield.
1. Warm‑up the pores
Start by letting a steady stream of lukewarm water run over your hair for about a minute. The gentle heat opens the pores, making it easier for the exfoliant to reach the dead‑skin layer.
Do you ever feel that satisfying “softening” when you step into a warm shower after a cold day? That’s the same principle, only we’re using it for your scalp.
2. Apply the exfoliant with intention
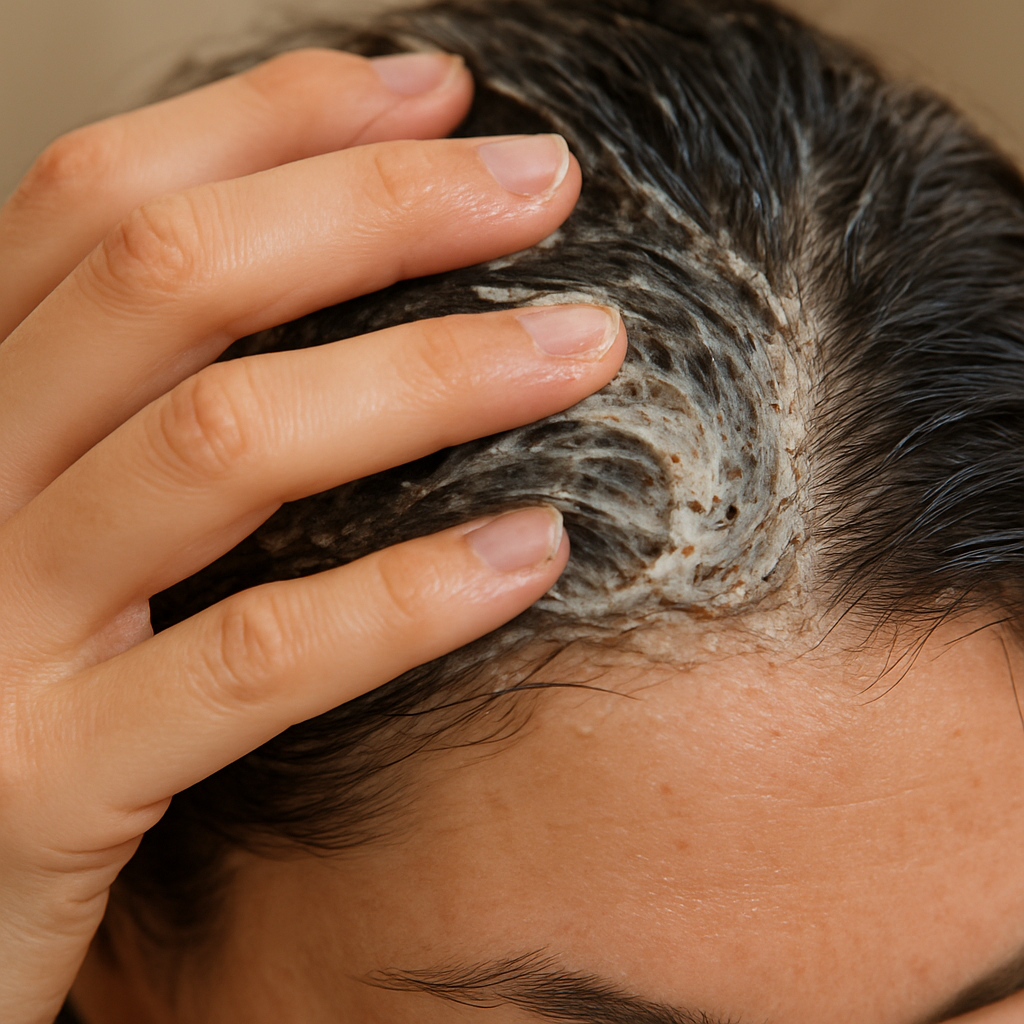
Take a pea‑size amount of your chemical exfoliant – think salicylic‑acid or glycolic‑acid based serum – and dab it directly onto the damp scalp. If you prefer a physical scrub, sprinkle a thin layer of fine sugar‑salt mix onto the roots.
Remember the advice from Dr Dominic Burg: gritty scrubs can inflame the scalp, whereas oil‑soluble acids like salicylic acid dissolve the bond between dead cells and sebum without harsh abrasion. According to Dr Burg, chemical exfoliation is the gentler, more effective route for most hair‑growth concerns.
Use the pads of your fingers, not your nails, and move in slow, circular motions. Think of it as a mini‑massage – you want a pleasant tingling, not a painful scrape.
3. Time it right
Set a timer for 60 seconds if you’re using a physical scrub, or follow the product’s instructions – usually 5‑10 minutes for a chemical leave‑on. Too long and you risk over‑exfoliating, which can trigger that “panic mode” where the scalp produces excess oil.
So, what should you do if the clock ticks past the recommended window? Stop immediately, rinse thoroughly, and give your scalp a day or two to recover before the next session.
And don’t forget to breathe – a relaxed mind helps keep the scalp calm.
4. Rinse with cool water
After the allotted time, switch the water to a cool setting and rinse for 30 seconds. The cooler temperature helps close the pores, locking in the benefits you just created.
Pat your hair dry with a soft microfiber towel – no vigorous rubbing. Rubbing can re‑introduce friction that you just worked so hard to avoid.
5. Soothe and seal
Once the scalp is dry to the touch, apply a light, soothing serum or a scalp‑friendly conditioner. This step replenishes moisture and reduces any residual redness.
Think of it as the after‑shave balm for your head – it calms, hydrates, and tells the follicles, “We’ve got you covered.”
Do you ever wonder why some people swear by a post‑treatment boost? It’s simply about giving the scalp a balanced environment to stay in growth mode.
6. Troubleshooting tips
If you notice lingering irritation after 24 hours, scale back the frequency or swap to a milder formulation. Redness that lasts beyond a day could be a sign you’re over‑exfoliating.
And if you’re new to chemical exfoliants, start with a half‑strength product and gradually build up as your scalp tolerates it.
Does this feel doable? Absolutely – it’s just a few minutes in the shower, but the payoff can be a noticeably fresher scalp and, over time, thicker‑looking hair.
Ready to give it a go? Grab your chosen exfoliant, set that timer, and treat your scalp like the spa it deserves to be.
Step 5: Post‑Exfoliation Care for Optimal Hair Growth
Okay, you’ve just finished the scrub, the tingling has faded and your scalp feels fresh. What you do next is the secret sauce that turns a one‑off cleanse into a real growth boost.
Cool down and seal the pores
First, rinse with cool water for about thirty seconds. That quick chill helps the pores close, locking in the clean surface you just created. Then pat dry with a soft towel – no rough rubbing, just a gentle press.
Once the scalp is dry to the touch, reach for a light, soothing serum or a scalp‑friendly conditioner. Think of it as the after‑shave balm for your head – it calms, hydrates and tells the follicles, “We’ve got you covered.”
- Choose a serum that mentions calming ingredients like aloe, tea tree or chamomile.
- Apply with the pads of your fingertips, not your nails.
- Leave it on; no need to rinse.
Does this feel doable? Absolutely – a few seconds in the shower, then a quick swipe of serum, and you’re set.
Moisturise wisely
After the seal, a light moisturiser keeps the scalp from over‑producing oil in response to the exfoliation. A non‑greasy facial oil or a water‑based scalp lotion works wonders.
Remember the rule from Cancer Hair Care: regular moisturising helps maintain a healthy scalp environment, especially after a deep clean according to their scalp‑care guidance. Just a few drops, massaged in circular motions, is enough to seal in the benefits without weighing the hair down.
And if you’re wondering whether a heavier cream is better – nope. Light is the name of the game, otherwise you’ll end up with that sticky feeling that makes you want to wash again right away.
Gentle scalp massage
While the serum is still wet, give yourself a five‑minute scalp massage. Use your fingertips, press lightly and move in small circles. This extra pulse of blood flow delivers oxygen and nutrients straight to the follicles.
Here’s a quick checklist:
- Start at the hairline, work toward the crown.
- Spend about ten seconds on each section.
- Finish with a soft tap on the top of the head to “wake up” the nerves.
Does a quick massage sound like a waste of time? On the contrary – it’s the mini‑workout that tells your scalp you’re still in growth mode.
Protect and maintain
Now that your scalp is calm, hydrated and stimulated, think about the next few days. Avoid harsh shampoos for 24‑48 hours; a gentle, sulfate‑free cleanser is enough.
If you wear hats, wigs or headscarves, give your scalp a breather whenever you can. A short period without coverage lets air circulate, reducing the risk of irritation.
Some folks like to add a targeted serum like the OS‑01 Hair serum for an extra boost. The formula is designed to support a healthy scalp microbiome and even offers mild exfoliation benefits as described by OneSkin. Apply it after your calming serum for a layered approach.
Keep heat styling to a minimum for the next 48 hours – hot tools can reopen pores and undo the soothing work you just did. If you must use a dryer, switch to a cool‑shot setting.
Consider a nighttime routine: a thin layer of a light oil or a silk pillowcase can prevent friction while you sleep, keeping the scalp environment stable.
Finally, set a reminder on your phone: “Post‑exfoliation care”. A simple cue keeps the routine consistent, and consistency beats intensity every time.
So, what’s the next move? Grab your favourite soothing serum, give your scalp that cool rinse, massage gently, seal the deal and protect it for the next couple of days. Your follicles will thank you with stronger, thicker growth over the weeks ahead.
Step 6: Frequency, Mistakes to Avoid and When to Seek Professional Help
Now that you’ve got the basics down, it’s time to talk about how often you should be exfoliating and the potholes that can turn a simple routine into a scalp disaster.
Finding the sweet spot
Most experts agree that a gentle scalp exfoliation once every seven to ten shampoos hits the right balance – enough to clear buildup without stripping the skin’s natural oils. Byrdie’s guide echoes this, suggesting a weekly session for most people, or every two weeks if you have a more sensitive scalp.
Think of it like watering a plant. Too much water and the roots drown; too little and they wilt. Your scalp needs that regular “spring cleaning” but also time to recover.
Common mistakes that sabotage growth
Here are the slip‑ups that can actually slow hair growth instead of boosting it:
- Over‑scrubbing. Rubbing hard or using a rough scrub can tear the skin, cause redness, and even lead to bleeding. That’s the exact opposite of the gentle massage we’re after.
- Using fingernails. Your nails are built for scratching, not exfoliating. They can create micro‑abrasions that become entry points for infection. Use the pads of your fingers or a soft‑bristle brush instead.
- Skipping the post‑care. After you rinse, failing to apply a soothing serum or light oil leaves the fresh skin exposed, prompting it to over‑produce oil.
- Choosing the wrong product. Harsh micro‑beads or high‑pH acids can upset the scalp’s pH balance, leading to dryness or excess sebum. Opt for formulas that list gentle beads or fruit enzymes first.
- Exfoliating too often. Doing it more than twice a week can trigger “panic mode” where the scalp ramps up oil production, making hair look greasier and heavier.
These pitfalls are mentioned in a salon’s list of hair‑growth blockers, where over‑exfoliation is flagged as a top mistake that can actually impede progress according to Avalanche Salon & Spa.
Signs you’re overdoing it
If you notice persistent tingling, redness that lasts beyond a day, or an itchy scalp that seems to get worse after each session, it’s a red flag. Your skin is telling you it needs a break.
Another tell‑tale sign is an oily sheen appearing sooner than usual after washing. That’s the scalp compensating for lost moisture.
When to call in a professional
Most of us can manage a gentle weekly exfoliation at home, but there are moments when a dermatologist or trichologist should step in:
- You have a chronic skin condition like eczema, psoriasis, or severe acne on the scalp.
- Bleeding or open sores appear after exfoliation and don’t heal within a few days.
- Excessive flaking or dandruff persists despite using gentle products.
- You’re on medication that affects skin turnover and you’re unsure how to adjust your routine.
In those cases, a professional can recommend a prescription‑strength serum, advise on the optimal frequency, or suggest alternative treatments like low‑level laser therapy.
Quick checklist for safe exfoliation
- Start with a mild shampoo, rinse with lukewarm water.
- Apply a pea‑size amount of exfoliant, massage gently for 30‑60 seconds.
- Rinse with cool water, pat dry, then apply a light calming serum.
- Schedule the next session after 7‑10 washes, or every 14 days if you’re sensitive.
- Watch for irritation; if it appears, extend the interval or switch to a milder product.
- Seek professional advice if you notice persistent redness, bleeding, or worsening scalp conditions.
Stick to this rhythm, avoid the common traps, and you’ll keep your scalp clean, calm, and ready to support stronger, thicker hair.
Conclusion
So, you’ve walked through the why, the how, and the little tricks that keep scalp exfoliation for hair growth safe and effective. If you’re still wondering whether it’s worth the extra minute in the shower, think of it as a quick spa session that clears the path for healthier follicles.
Remember the core idea: a clean, balanced scalp welcomes nutrients, boosts circulation, and reduces the friction that can slow growth. That’s the same principle behind every tip we’ve shared – from gentle scrubs to the calming serum you apply afterwards.
Here’s a simple cheat‑sheet to keep on your bathroom mirror:
- Exfoliate gently once every 7‑10 washes (or every 14 days if you’re sensitive).
- Use a pea‑size amount, massage for 30‑60 seconds, then rinse with cool water.
- Follow with a light, soothing serum to lock in moisture.
- Watch for irritation; if redness lingers, extend the interval.
And if you ever hit a snag – persistent redness, bleeding, or stubborn dandruff – don’t hesitate to seek professional advice. A dermatologist can fine‑tune the routine for your unique scalp.
Give it a go for a few weeks, note the differences, and let your scalp do the talking. Your follicles will thank you with fuller, stronger hair. Ready to make scalp exfoliation a regular part of your routine? Let’s start today.
FAQ
How often should I do scalp exfoliation for hair growth?
Most people find a sweet spot by exfoliating once every 7‑10 washes, which is roughly once a week. If your scalp feels sensitive or you notice a little redness, stretch the interval to every 14 days. The key is to give your skin a day or two to settle after each session, so you avoid triggering excess oil production that can weigh hair down.
Can I use a DIY sugar‑salt scrub, or should I stick to a commercial product?
A DIY mix of fine sea salt and brown sugar works fine as long as you keep the grains gentle and massage lightly for no more than a minute. Commercial exfoliators often contain pre‑balanced bead sizes or fruit enzymes, which can be kinder to delicate scalps. If you’re new to exfoliation, start with a mild product and test a small patch before moving to a homemade blend.
Will scalp exfoliation help with dandruff or an itchy scalp?
Yes, clearing away dead skin and excess sebum can reduce the environment that encourages dandruff‑forming yeast. By loosening the flaky layer, you allow anti‑dandruff shampoos to work more effectively. Pair the exfoliation with a soothing post‑treatment serum that contains tea tree or aloe to calm any residual itch.
Is it safe to combine scalp exfoliation with colour‑treated or chemically processed hair?
Generally it is safe, but you’ll want to be extra gentle. Chemical treatments already stress the cuticle, so use a light, fine‑grained scrub or a low‑strength enzyme mask. Limit the session to 30‑45 seconds and follow up with a deep‑conditioning mask to replenish moisture. If you notice increased lift or fading, cut back to once every two weeks.
What’s the best time of day to exfoliate my scalp?
Most people prefer doing it in the shower, either in the morning before you style or in the evening as part of a winding‑down routine. The warm water opens pores, making the exfoliant more effective, and the cool rinse afterward helps close them. Choose a time when you can give yourself a relaxed minute or two without rushing.
How do I know if I’m over‑exfoliating?
Redness that lasts longer than 24 hours, a persistent burning sensation, or an oily sheen appearing soon after washing are clear warning signs. Your scalp might also feel tight or start flaking more than usual. If any of these symptoms pop up, step back to once every two weeks or switch to a milder, enzyme‑based product for a while.
Should I see a dermatologist if I experience irritation?
If irritation lingers beyond a couple of days, you notice bleeding, or you have an existing skin condition like eczema or psoriasis, it’s wise to book a professional appointment. A dermatologist can recommend prescription‑strength serums or tailor the exfoliation frequency to your scalp’s unique needs, ensuring you stay on track with hair‑growth goals.