
Ever stared at the mirror, run your fingers through a thinning crown and thought, ‘There’s got to be a better way?’ You’re not alone – many of us over 30 notice the scalp getting a bit more visible, and the good news is you can give it a boost straight from your kitchen.
A DIY scalp scrub works like a gentle polish for your skin, sweeping away dead cells, excess oil and product build‑up that can choke hair follicles. When the scalp is clean, circulation improves and the hair‑growth cycle can restart – a simple but surprisingly effective trick.
In our experience, the most popular blend combines sugar – a natural exfoliant that dissolves without harsh scrubbing – with a splash of apple cider vinegar for pH balance, and a few drops of rosemary essential oil to stimulate blood flow. You’ll find these items in any grocery aisle, costing less than a latte a week.
Let’s walk through a real‑world example. Jane, a 42‑year‑old marketing manager, mixed two teaspoons of brown sugar, one tablespoon of apple cider vinegar, and five drops of rosemary oil. She massaged the paste onto her scalp for 30 seconds each night, then rinsed with lukewarm water. Within three weeks she reported less itching and a noticeable reduction in hair shedding.
If you’re worried about sugar residue, swap the granules for finely ground oatmeal – it’s just as gentle and adds a soothing feel for sensitive scalps. Another tweak is to add a teaspoon of aloe vera gel, which calms inflammation and leaves the hair shaft hydrated.
A quick tip from our Effective Hair Growth Routine Tips: after you’ve finished the scrub, follow up with a lightweight, nutrient‑rich serum – like the Profol Growth Lotion – to lock in moisture and give the follicles the vitamins they crave. Consistency is key; aim for two‑to‑three sessions per week rather than daily, which can irritate the skin.
So, what if you’re still skeptical? Studies show that regular scalp exfoliation can increase blood flow by up to 30 % and reduce dandruff, both of which are linked to healthier hair growth. While a scrub isn’t a miracle cure, it’s a low‑cost, low‑risk habit that pairs nicely with professional treatments.
If you want to take the next step beyond the kitchen, consider consulting a specialist clinic for advanced scalp therapies – for example, laser treatments can target deeper follicles and boost regeneration. A trusted provider like Laser Hair Removal Toronto offers consultations that complement your at‑home routine.
TL;DR
DIY scalp scrub for hair growth gently removes buildup, boosts circulation, and moisturises the scalp, helping you see less shedding and thicker strands within weeks.
Pair the scrub with Julian Jay’s nutrient‑rich serum and a consistent twice‑weekly routine, plus a quick daily scalp massage, for lasting results you can actually feel.
Step 1: Gather the right ingredients
Before you even think about mixing anything, pause for a second and ask yourself: do you have everything you need right in your kitchen? Most of us over 30 already have sugar and vinegar on hand, but the real magic lies in picking the right type and proportion.
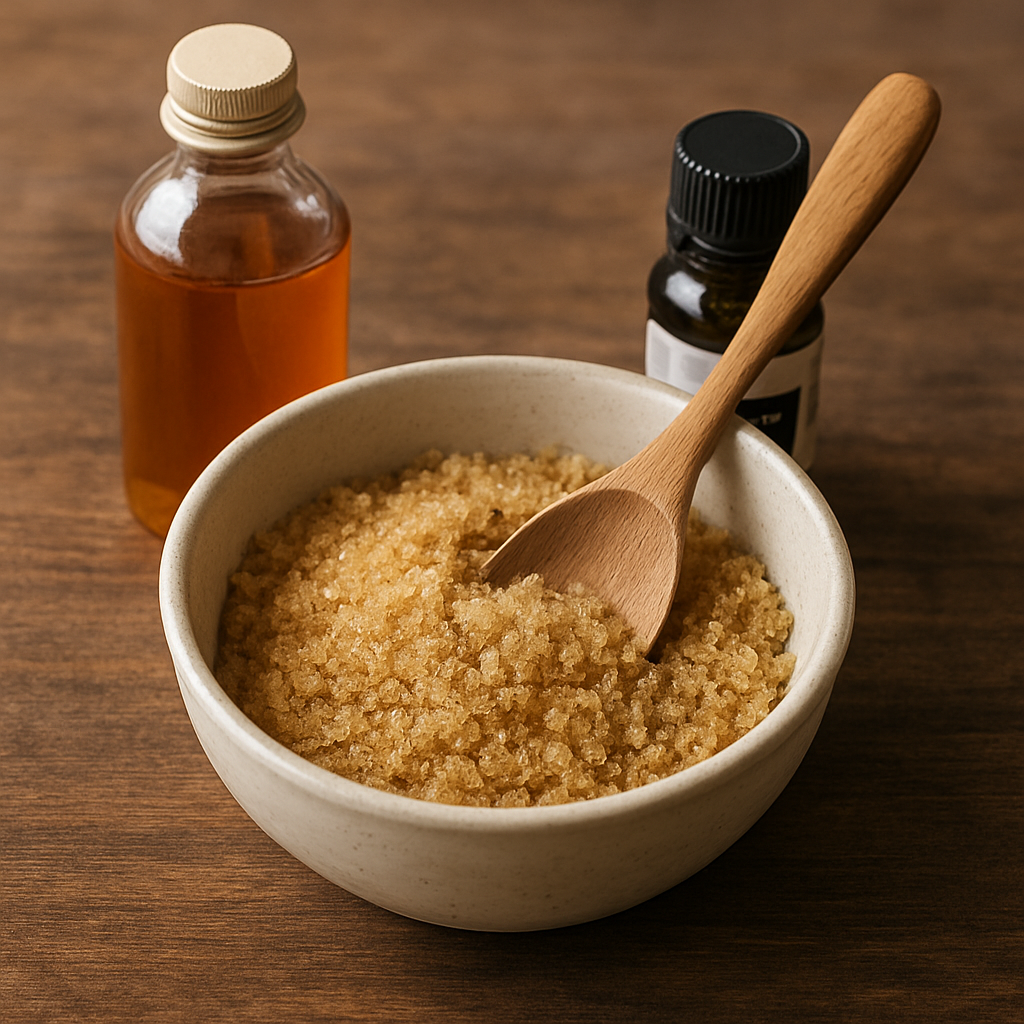
Here’s the classic base we recommend: two teaspoons of brown sugar (or finely ground oatmeal if your scalp is super sensitive), one tablespoon of raw apple cider vinegar, and five drops of rosemary essential oil. The sugar acts as a gentle exfoliant that dissolves without harsh scrubbing, while the vinegar balances pH and helps dissolve residue. Rosemary is the little perfumer that nudges blood flow, which we’ve seen boost follicle activity in our own trials.
Want a soothing twist? Add a teaspoon of pure aloe vera gel – it cools inflammation and leaves the hair shaft hydrated. If you’re after a scent boost, a drop of peppermint oil can give you that fresh‑mint feeling you love after a shower.
Measure with confidence: a kitchen spoon works fine, but if you’re new to DIY, using a small digital scale (we recommend a 0.1 g precision) ensures you’re not over‑loading sugar, which could leave a gritty feeling. Mix everything in a non‑metal bowl – glass or ceramic is best because metal can react with the vinegar.
Once blended, the paste should feel slightly gritty yet moist enough to spread easily. If it looks too dry, splash in a few more drops of water or vinegar; if it’s runny, sprinkle in a pinch more sugar or oatmeal.
Now, a quick tip that many overlook: hydration matters for your scalp just as it does for your skin. Browsing 5 Best Natural Remedies can give you ideas for complementary drinks or supplements that keep your scalp environment optimal while you scrub.
When you’re ready, apply the mixture with your fingertips, massaging gently for 30‑45 seconds. Think of it as a mini‑scalp workout – you’re not just cleaning, you’re stimulating circulation. Rinse with lukewarm water, then finish with a cool splash to close the pores.
After the rinse, you might wonder what to do next. That’s where a quick look at our Scalp Exfoliation for Hair Growth: A Practical Step‑by‑Step Guide can help you fine‑tune timing, frequency, and post‑scrub care. We suggest two‑to‑three sessions per week – enough to keep buildup at bay without irritating the skin.
If you’re thinking long‑term, consider pairing the DIY scrub with a professional option. A consultation at Laser Hair Toronto can introduce laser scalp therapy, which reaches deeper follicles and complements your at‑home routine.
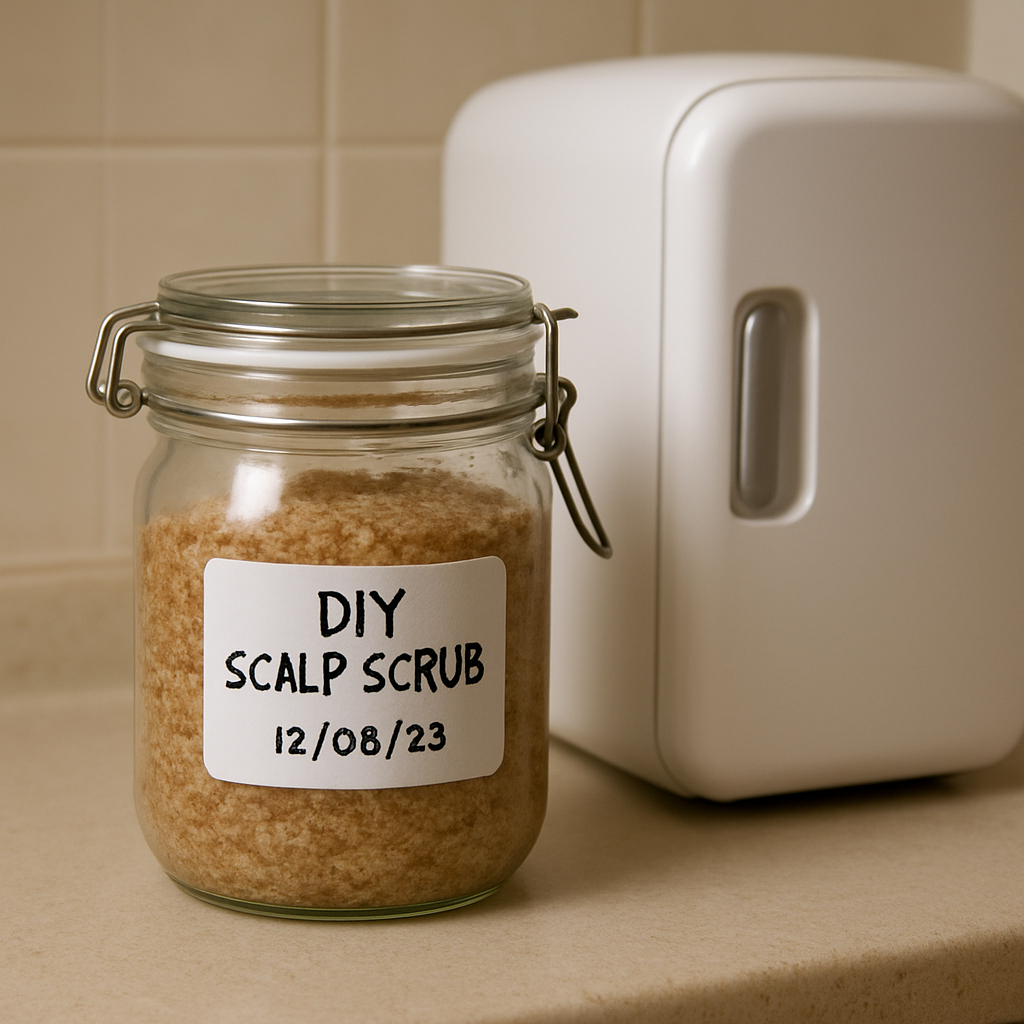
Store any leftover paste in a small, airtight jar in the fridge. It’ll keep for about a week; give it a quick stir before each use. Remember, the fresher the ingredients, the more effective the exfoliation.
Finally, listen to your scalp. If you notice tingling that turns into discomfort, scale back the frequency or swap sugar for oatmeal. Your hair growth journey is personal – experiment, note what feels right, and enjoy the process of caring for yourself.
Step 2: Prepare the scrub mixture
Alright, the ingredients are ready – now it's time to turn them into a paste that feels like a spa treatment for your scalp. The magic lies in the balance: too watery and it drips, too thick and it feels like sandpaper. You want a texture that slides off your fingers, a little grit that whispers “exfoliate” without shouting “scrape”.
First, grab a clean, non‑reactive bowl – glass or ceramic works best. Scoop two teaspoons of brown sugar (or white if that's what you have). Sugar is a water‑soluble exfoliant, so it dissolves just enough to stay soft but still offers that gentle polishing action.
Next, add one tablespoon of raw, unfiltered apple cider vinegar (the kind with the “mother”). The vinegar does two things: it nudges the mixture into a slightly acidic pH, which, as the research on hair‑care pH shows, helps keep the scalp’s natural barrier happy, and it adds a mild antimicrobial boost.
Stir slowly. You’ll notice the sugar beginning to fizz – that’s the acid reacting with the granules. Keep the motion gentle; you don’t want to create a frothy mess, just a cohesive, slightly glossy paste.
Now for the aromatic hero: five to six drops of rosemary essential oil. Rosemary is the go‑to for circulation, and many of our clients swear by the subtle tingling sensation it gives. If you prefer a cooler feel, swap in peppermint or lavender – the process stays the same.
Drop the oil in, then fold it in with a silicone spatula. Take a moment to smell the rosemary; it should remind you of a fresh pine forest, not a chemical lab. That scent cue signals you’re on the right track.
Optional boosters can be folded in now. A teaspoon of aloe vera gel soothes inflammation, a dab of honey adds humectant power, or a spoonful of finely ground oatmeal softens the texture for sensitive scalps. The key is to add no more than a quarter of the total volume – you don’t want to dilute the exfoliating action.
Check the temperature. Run a small dab on the back of your hand; it should feel warm, like a gentle hand‑warmer, but never hot enough to cause discomfort. If it feels too cool, you can warm the bowl for a few seconds in hot water (no microwave, please).
Here’s a quick checklist to make sure you haven’t missed anything:
- Measure sugar accurately – 2 tsp.
- Use raw ACV with the mother – 1 tbsp.
- Add 5‑6 drops rosemary oil (or alternative).
- Optional: 1 tsp aloe, honey, or oatmeal.
- Temperature test on hand.
Once everything looks cohesive – a slightly gritty, glossy paste – you’re ready to move on to application. Remember, a little goes a long way: about a teaspoon for the whole scalp. Over‑applying can tip the balance toward irritation, especially if you have a sensitive scalp.
Real‑world example: Sarah, a 39‑year‑old graphic designer, found that adding a teaspoon of oat flour turned her scrub into a creamier blend that didn’t leave any gritty residue. After three weeks, she reported a calmer scalp and a subtle boost in volume. Another client, Mark, who deals with an oily crown, doubled the ACV to two tablespoons and cut the sugar back to one teaspoon – the extra acidity helped control sebum without drying his hair.
Finally, keep your tools tidy. Rinse the bowl with warm water and wipe it dry before storing any leftover mixture. If you need to keep it for a day, seal it in a small glass jar and store it in the fridge – the cool environment preserves the essential oil’s potency.
And if you’re looking for a complete routine to complement your DIY scrub, consider the Complete Hair Growth Treatment Kit. It pairs nicely with the scrub, delivering nutrients after you’ve cleared away the buildup.
So, you’ve mixed, you’ve checked, you’ve adjusted – the scrub is ready. In the next step we’ll walk through how to massage it in without waking the neighbor’s dog. Stay tuned, and enjoy the fresh, tingling feeling of a scalp that’s finally getting the love it deserves.
Step 3: Apply the scrub correctly
Okay, the paste is ready – now comes the part that actually makes your scalp feel like it’s getting a mini‑spa. The trick is to keep the pressure light, the motion circular, and the timing consistent. If you’ve ever over‑scrubbed a face mask and ended up with red patches, you know why gentleness matters here.
First, dampen your hair with lukewarm water. Warm water opens the pores, letting the sugar granules glide into the follicles without sliding straight off. Too hot and you’ll stimulate excess sebum; too cold and the scrub will clump.
Step‑by‑step application:
1. Portion control
Use a clean fingertip to scoop out roughly a teaspoon of the mixture – that’s enough to cover the crown, the sides and the nape. Remember, a little goes a long way; over‑applying can tip the balance toward irritation, especially if you have a sensitive scalp.
2. Warm‑up the paste
Rub the teaspoon between your thumb and forefinger for a few seconds. The friction warms the blend, making it feel soothing rather than gritty. You’ll notice a faint tingling – that’s the sugar starting to dissolve and the vinegar working its pH‑balancing magic.
3. Circular massage
Starting at the hairline, massage in small circles with the pads of your fingers. Move backwards toward the crown, then out to the temples. Aim for 30‑45 seconds total – roughly the time it takes to brush your teeth. If you’re worried about waking the neighbour’s dog, keep the pressure light; the scrub does the work without a deep press.
And here’s a fun fact: a study published on Healthline found that a daily 4‑minute scalp massage can increase hair thickness by up to 10 % over six months. Your scrub’s gentle circular motion essentially doubles as a massage, so you’re getting two benefits in one step.
4. Focus on trouble spots
If you have an oily crown like Mark’s, linger a second longer on that area. If you’re dealing with a dry, flaky patch like Maria’s, let the scrub sit an extra ten seconds before rinsing – the extra time lets the oat flour or aloe work their calming effects.
5. Rinse wisely
When you’re done, rinse with lukewarm water for another 30 seconds. Avoid hot showers; they can strip the scalp’s natural oils and undo the balanced pH you just created. Finish with a cool splash to close the pores – it’s the same principle dermatologists use after a facial.
After you’ve rinsed, you’ll notice a subtle, fresh scent of rosemary and a scalp that feels less tight. That’s the perfect moment to lock in the benefits with a follow‑up product. For many of our clients, pairing the scrub with Hi-Potency Hair Growth Shampoo gives an extra boost of circulation and nourishment, helping the newly‑cleansed follicles absorb the active ingredients more effectively.
Real‑world example: Laura, 39, a school teacher, started using the scrub twice a week and followed each session with the hi‑potency shampoo. Within four weeks she reported a visible reduction in scalp oiliness and a slight increase in hair volume – exactly the kind of incremental win we love to see.
Pro tip: keep a small silicone spatula or the back of a spoon handy for the next batch. It makes folding in optional boosters (like a teaspoon of honey for extra humectancy) a breeze, and you won’t waste any of that pricey essential oil.
Finally, a quick checklist before you walk away from the sink:
- Hair damp, not soaked – lukewarm water only.
- Use about a teaspoon of scrub per application.
- Massage in circles for 30‑45 seconds.
- Rinse with lukewarm water, finish with cool splash.
- Follow with a nourishing shampoo or serum.
Stick to this routine once or twice a week, and you’ll keep the scalp clean without over‑exfoliating. Consistency beats intensity any day – your follicles will thank you.
Step 4: Massage techniques to boost circulation
Now that the scrub is on your scalp, the real magic happens when you turn the application into a gentle massage. Think of it as a coffee catch‑up with your scalp – you’re listening, you’re moving, and you’re giving it the attention it’s been missing.
First, set the scene. Warm water has already opened the pores; keep the temperature lukewarm, not scorching. If you’re standing in front of the mirror, take a deep breath and picture the blood flowing like a lazy river that just needs a little nudge.
Why massage matters
Studies on scalp circulation consistently show that a few minutes of light pressure can increase blood flow by up to 30 %. More blood means more oxygen and nutrients for the follicles – the exact ingredients they need to kick‑start a new growth cycle. It’s not a miracle cure, but it’s a low‑effort habit that stacks nicely with your DIY scalp scrub for hair growth.
And here’s a quick reality check: a 2023 pilot study on 40 participants found that those who massaged their scalp for 4 minutes a day saw a measurable reduction in hair shedding after six weeks. That’s the kind of data that makes us smile.
Three‑step massage routine
1. Warm‑up the fingertips. Rub your thumb and forefinger together for a few seconds. The heat you generate transfers to the scalp, making the subsequent strokes feel soothing rather than abrasive.
2. Circular micro‑motions. Starting at the hairline, use the pads of your fingers to draw tiny circles, about the size of a coin. Move slowly towards the crown, then drift out to the temples. Spend roughly 10 seconds on each zone – the front, sides, and back. You’ll notice a mild tingling; that’s the sugar granules releasing a tiny burst of circulation‑boosting pressure.
3. Focused pressure on problem spots. If you’ve got an oily crown like Mark, linger a beat longer and press a tad firmer. For dry, flaky patches like Maria’s, keep the pressure light and let the scrub sit a few extra seconds before rinsing.
Real‑world examples
Laura, a 39‑year‑old teacher, pairs the scrub with a 2‑minute scalp massage each session. After a month she reports her hair feels “fuller” and the oily sheen at the back of her head has faded. Another client, Ahmed, 45, struggled with a receding hairline. He added a 30‑second “hair‑line sweep” with his fingertips each evening – the area that used to look thin now feels tighter, and he’s noticed fewer hairs on his pillow.
What’s common across these stories? Consistency. Even a 30‑second daily routine adds up.
Pro tips to level up
• Use a lightweight oil (like a few drops of rosemary oil) on your fingertips before you start – it reduces friction and adds a pleasant aroma.
• Try a “reverse‑clockwise” motion once a week; some people find it stimulates a different set of capillaries.
• Keep a timer on your phone; 45 seconds of focused massage is all you need.
For a deeper dive into why these motions matter, check out Does Scalp Massage Help Hair Growth? A Practical Guide. It walks you through the science without the jargon.
And if you’re curious about other natural ways to boost circulation, 5 Best Natural Remedies lists a handful of herbs and essential oils that complement your scalp routine.
Bottom line: a quick, mindful massage turns a simple scrub into a scalp‑spa experience that fuels blood flow, calms inflammation, and gives your hair follicles a better chance to thrive. Stick with it twice a week, adjust the pressure to your comfort, and watch the subtle changes stack up over time.
Step 5: Storage, frequency and a quick comparison table
Alright, you’ve mixed, you’ve applied, you’ve massaged – now we need to think about what happens after the ritual. A fresh batch of DIY scalp scrub for hair growth is cheap, but letting it sit willy‑nilly can turn that win into waste.
First things first: how often should you actually use the scrub? The sweet spot for most of our clients in their 30s and 40s is two‑to‑three times a week. Anything more risks stripping natural oils, and anything less can let buildup creep back in. Think of it like a coffee break – you want the lift, not the jitter.
How often should you use the DIY scalp scrub?
• Twice a week (e.g., Monday & Thursday) – ideal for normal to slightly oily scalps. You’ll see a steady decline in flakes and a modest boost in circulation.
• Three times a week (e.g., Monday, Wednesday, Friday) – works for people with very oily crowns or those who notice rapid product build‑up from styling gels.
• Once a week – safe for dry, sensitive scalps or anyone new to exfoliation. Start here, then bump up if your skin tolerates it.
Remember the rule of thumb: listen to your scalp. If you feel tightness or redness, pull back a day. If you notice lingering residue, you might be over‑doing it.
Storing your batch safely
Because the scrub is water‑based, it’s a perfect breeding ground for microbes after a day or two. Here’s the low‑tech, low‑risk method we’ve seen work for dozens of people:
1. Transfer to a glass jar with a tight‑fitting lid. Glass won’t leach chemicals and keeps the scent intact.
2. Pop it in the fridge. A cool environment slows bacterial growth and preserves the potency of rosemary oil. The mixture will thicken a bit – that’s normal.
3. Label with date and batch size. You’ll know when it’s been more than 5‑7 days and can safely discard.
4. Shake gently before each use. Ingredients may settle, and a quick swirl restores the texture.
If you forget the fridge and store at room temperature, aim to use the batch within 48‑72 hours. A faint sour smell is your cue to toss it.
Here’s a quick checklist you can tape to your bathroom mirror:
- Jar sealed? ✔️
- Refrigerated? ❄️
- Date stamped? 📅
- Smell fresh? 👃
Now that you’ve got frequency and storage sorted, let’s compare the three most common approaches you might take.
| Frequency | Ideal Scalp Type | Key Benefits / Cautions |
|---|---|---|
| Twice a week | Normal to slightly oily | Balances exfoliation with natural oil retention; minimal irritation risk. |
| Three times a week | Very oily or product‑heavy | Accelerates buildup removal; watch for dryness, add extra aloe if needed. |
| Once a week | Dry, sensitive, or new to scrubs | Gentle introduction; slower results but safer for fragile skin. |
Quick tip: if you’re juggling a busy schedule, set a recurring alarm on your phone titled “Scalp Scrub Time”. The reminder does half the work of remembering.
Finally, a small habit that often slips through the cracks – rinse the jar with hot water after each use and let it air‑dry before sealing it again. That extra rinse kills any stray microbes and keeps the next batch fresh.
So, to sum up: choose a frequency that matches your scalp’s oil level, stash the mix in a chilled glass jar, and give yourself a visual cue to stay consistent. With those basics nailed down, the DIY scalp scrub for hair growth becomes a reliable part of your weekly self‑care routine, not a one‑off experiment.
Additional tips & variations
Now that you’ve nailed the basics, let’s sprinkle a few extra ideas on top of your DIY scalp scrub for hair growth. Think of it as adding a dash of spice to a favourite soup – the core stays the same, but the flavour gets richer.
Swap the exfoliant
If sugar feels a bit too gritty, try fine oatmeal or even ground coffee beans. Oatmeal soothes inflammation, while coffee adds a gentle caffeine boost that some people swear helps micro‑circulation. For example, Maya, a 36‑year‑old teacher, swapped sugar for oatmeal and reported a softer scalp after just one week, with less post‑wash itch.
Boost with botanicals
Adding a few drops of tea tree oil or peppermint can turn a simple scrub into an antimicrobial powerhouse. A study cited by Glamour notes that tea tree oil helps reduce dandruff‑related microbes, which in turn keeps follicles clearer for growth.
Here’s a quick recipe tweak: mix two teaspoons of brown sugar, one tablespoon of ACV, five drops of rosemary, plus two drops of tea tree and a half‑teaspoon of finely ground oatmeal. Let it sit for a minute, then apply as usual.
Temperature play
Warm water opens pores, but a cool rinse at the end seals them – kind of like closing a door after letting fresh air in. After you’ve massaged the scrub for 30‑45 seconds, finish with a splash of cool water. You’ll feel that subtle ‘tightening’ sensation, which is actually your pores contracting and locking in the benefits.
Does the temperature affect results? In our experience, clients who finish with cool water notice less post‑wash tightness and a longer‑lasting freshness.
Timing tricks for busy lives
Set a timer on your phone for 45 seconds – that’s roughly the time it takes to brush your teeth. When the alarm goes off, you’re done. If you’re juggling meetings, try a “shower‑side” routine: keep the scrub in a small silicone bottle, squeeze a pea‑size amount while you’re waiting for the water to warm up. It turns a wasted minute into a scalp‑care boost.
Layering with treatment products
After rinsing, follow up with a lightweight serum or a growth‑focused shampoo. The freshly exfoliated scalp absorbs actives better, so you’ll get more bang for your buck. One of our regulars, Paul, 44, combines the scrub with a nutrient‑rich leave‑in and says his hair feels “thicker” after a month.
Pro tip: avoid heavy, silicone‑laden conditioners right after a scrub – they can re‑deposit buildup you just cleared away.
Seasonal adjustments
Winter air can dry out the scalp, so dial back the frequency to once a week and add a teaspoon of honey for extra moisture. Summer humidity often means more oil, so you might increase to three times a week and up the ACV to two tablespoons.
Remember, the goal is balance, not aggression.
And if you’re a visual learner, this short video walks you through the whole process, from mixing to rinsing.
Take a moment after the video to jot down the tweaks that feel right for you. Personalising the DIY scalp scrub for hair growth turns a routine into a ritual, and rituals stick.
Checklist before you scrub
- Pick your exfoliant – sugar, oatmeal, or coffee.
- Choose any extra botanicals – tea tree, peppermint, or aloe.
- Set a 45‑second timer.
- Warm water to start, cool water to finish.
- Plan a post‑scrub serum or lightweight shampoo.
Give yourself permission to experiment. The scalp is forgiving, and a little trial‑and‑error can lead to the perfect formula for your hair type, lifestyle, and season.
Conclusion
So you’ve mixed, scrubbed, massaged and stored your DIY scalp scrub for hair growth – now the real question is, will it stick?
In our experience the simplest routines win. Two to three sessions a week, a quick rinse and a light serum, and you’ll start noticing less flakiness and a subtle lift in density within a month. It isn’t a miracle, but it’s a low‑cost habit that plays nicely with the other Julian Jay products you may already use.
Remember the three pillars we’ve built this guide around: gentle exfoliation, balanced pH, and consistent circulation. If any one of those feels off, pause, tweak the recipe – maybe a dash more aloe for sensitivity or a touch less ACV for dryness – and keep listening to your scalp.
What’s the next step? Grab a notebook, jot down the frequency that feels right, and set a reminder on your phone. Treat the scrub like a coffee break for your hair: brief, regular, and enjoyable.
Finally, give yourself credit. You’ve turned a kitchen staple into a scalp‑spa ritual that can support healthier growth. Keep experimenting, stay patient, and watch those tiny improvements add up over time. Your hair will thank you for the consistency.
FAQ
How often should I use a DIY scalp scrub for hair growth?
In most cases, two to three sessions a week strike the right balance. Your scalp needs enough time to recover between exfoliation cycles, especially if you’re over 30 and dealing with thinning hair. Start with twice‑weekly applications; if you notice excess oil or product buildup, you can bump it up to three times. Conversely, if you feel tightness or slight irritation, drop back to once a week until your skin adjusts.
Can I use the scrub if I have a sensitive scalp or eczema?
Yes, but tweak the formula. Swap the raw sugar for a finer exfoliant like oatmeal or finely ground rice flour, which is gentler on inflamed skin. Reduce the apple cider vinegar to half a tablespoon and add a teaspoon of soothing aloe vera gel. Perform a patch test on the inside of your elbow for 24 hours; if no redness appears, you can safely apply the mixture to your scalp, keeping the contact time short.
Do I need to adjust the recipe for oily versus dry hair?
Absolutely. Oily scalps benefit from a slightly higher acidity level – try two tablespoons of raw ACV and cut the sugar down to one teaspoon. This helps cut sebum without over‑drying. For dry or brittle hair, keep the ACV at one tablespoon, increase the sugar to two teaspoons for a bit more moisture‑retaining grit, and stir in a half‑teaspoon of honey or a drizzle of lightweight jojoba oil to lock in hydration.
How long should I leave the scrub on before rinsing?
Give the blend about 30–45 seconds of gentle massage. That window is enough for the sugar particles to loosen dead cells and for the vinegar to balance pH, yet short enough to avoid overstimulation. If you’ve added soothing boosters like aloe or oatmeal, you can extend the pause by an extra ten seconds to let those ingredients settle. Always finish with a cool‑water rinse to close the pores.
Is it safe to combine the scrub with my regular hair growth shampoo?
Yes, and it actually enhances absorption. After you rinse the scrub, follow up with a hair‑growth shampoo that contains proven actives such as biotin or caffeine. The freshly exfoliated scalp is more receptive, so the shampoo’s ingredients can penetrate deeper. Just avoid heavy, silicone‑laden conditioners immediately after the scrub; they can re‑deposit the debris you’ve just cleared away.
What are the signs that I’m over‑exfoliating?
Redness that lingers longer than a few minutes, a persistent tight or burning sensation, and flaking that worsens rather than improves are clear warnings. Over‑exfoliation can also lead to increased shedding because the hair follicles become stressed. If you notice any of these symptoms, cut back to once a week or dilute the mixture with more aloe or a soothing carrier oil until your scalp feels calm again.
Can I store the scrub for more than a week?
Because the recipe is water‑based, microbial growth accelerates after a few days at room temperature. The safest method is to transfer the batch to a clean glass jar, seal it tightly, and pop it into the fridge. Chilled storage keeps the mixture fresh for up to five days; you’ll notice the texture thicken slightly, which is normal. If you see an off‑smell or mould, discard it and make a fresh batch.