
Imagine you’ve just finished a long day, you stare at the mirror and notice a few more strands are looking a bit thin. That tiny disappointment? It’s the feeling many of us get when our hair just won’t bounce back the way it used to.
What if I told you there’s a simple, at‑home gadget that could give those follicles a gentle nudge, without the need for pricey salon visits or messy chemicals?
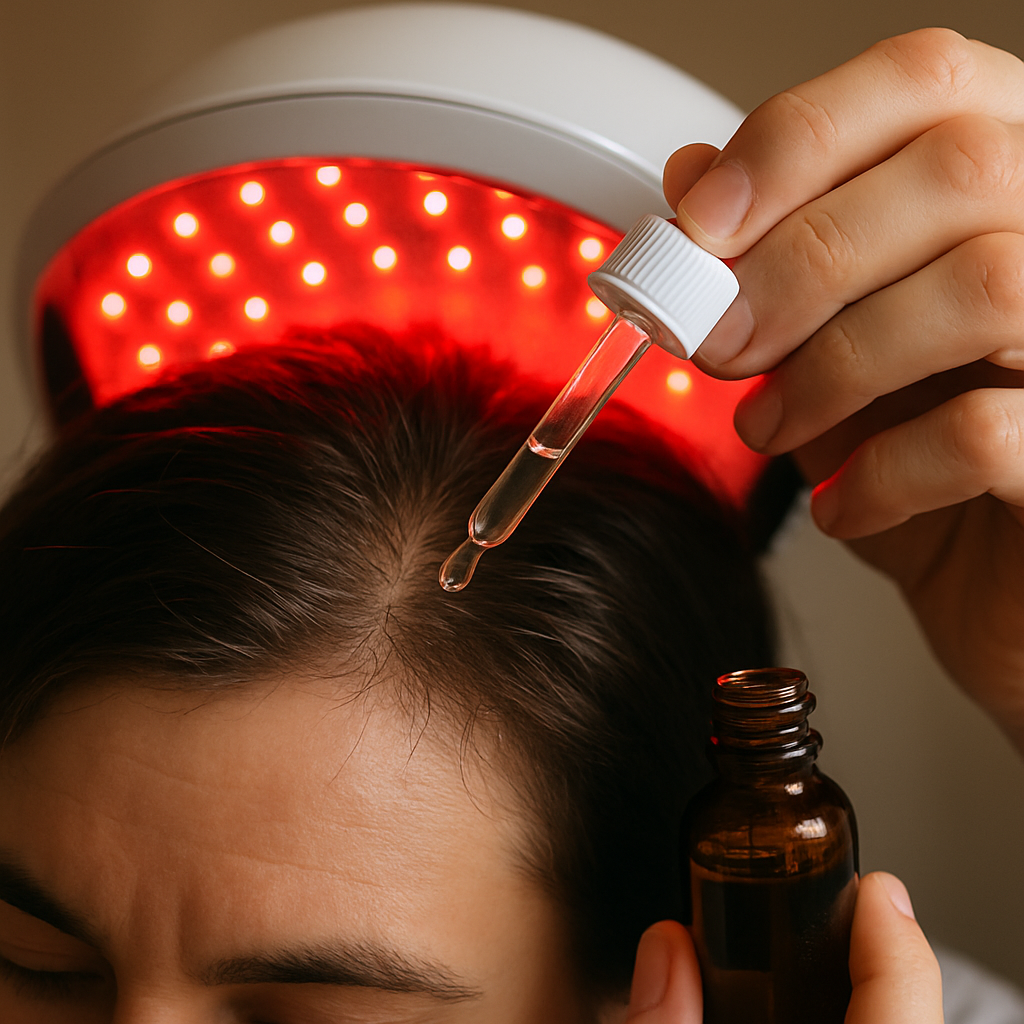
That’s where red light therapy for hair growth at home steps in – a low‑level laser or LED treatment that’s been buzzing in the wellness world for a few years now.
The science is surprisingly straightforward: red wavelengths, typically between 630 and 660 nm, penetrate the scalp and boost cellular activity, encouraging blood flow and stimulating the hair‑forming cycle. Think of it as a quiet pep‑talk for your follicles, coaxing them to re‑enter the growth phase.
You might wonder, “Does it actually work?” Plenty of small‑scale studies have shown increased hair density after a few weeks of regular sessions, and countless users swear by the visible difference after a month or two. The key, however, is consistency – a few minutes each day or a few times a week, depending on the device.
Now, before you dash off to buy the first shiny red‑light panel you see, let’s clear up a couple of myths. First, it’s not a miracle cure that will instantly regrow a full head of hair. Second, the devices you can set up on a bathroom shelf or a desk are safe, provided you follow the manufacturer’s guidelines and avoid staring directly at the light.
So, how do you get started? Pick a reputable home‑use unit, make a habit of treating your scalp while you’re brushing your teeth or scrolling through your favourite podcast, and pair the therapy with a nourishing routine – think gentle, sulphate‑free shampoo and a scalp‑friendly serum.
Feeling a bit skeptical? That’s totally normal. We all love a good before‑and‑after story, and the best way to know is to give it a fair trial, track your progress with photos, and see if the hair feels thicker, stronger, and more resilient.
Ready to give your scalp a little light‑filled boost? Let’s dive in and explore what to look for when choosing a red light therapy device, how to use it safely, and the complementary habits that maximise results.
TL;DR
Red light therapy for hair growth at home offers a low‑maintenance routine that gently stimulates follicles and adds thickness when used consistently. Pick a reputable LED device, treat your scalp while brushing or podcast‑listening, and track progress with weekly photos to spot clearly visible improvement in just weeks for you.
Step 1: Choose the Right Red Light Device
Alright, picture this: you’ve just scrolled past a dozen shiny red‑light gadgets on Amazon, and you’re wondering which one won’t end up as another dusty piece of tech on your shelf. The truth is, not every device is created equal – the magic lies in the details.
First off, wavelength matters more than the colour of the case. Dermatologists point out that the sweet spot for hair‑growth is somewhere between 620 nm and 678 nm, with many studies also backing 830 nm or higher for deeper penetration according to recent research. If the specs list a range that falls inside those numbers, you’re on the right track.
How to read the spec sheet like a pro
• Wavelength range: Look for 600‑700 nm or 830 nm+. Anything outside is probably less effective for follicles.
• Power output (mW/cm²): Higher power means the light reaches deeper, but it should still be safe for daily use. Around 5‑10 mW/cm² is a common sweet spot.
• LED count and coverage: More diodes usually translate to better scalp coverage. A helmet with 120‑200 LEDs can treat the crown, hairline and temples in one go.
Does that sound a bit technical? Don’t worry – we’ll break it down with real‑world examples.
Real‑world examples that actually work
Take the CurrentBody Skin LED Hair Growth Helmet. It emits 660 nm light, packs 120 LEDs and finishes a session in just 10 minutes. Users report less shedding after a few weeks and many say the silicone lining keeps the device snug without pulling hair.
Another favourite is the Laduora handheld brush. It combines red LEDs (650 nm) with a gentle micro‑current massage. Because it’s palm‑sized, you can target trouble spots like a receding hairline while you’re brushing your teeth. A busy mom I talked to swore by its 5‑minute “quick‑fix” before work.
On the higher‑end, the iRestore Essential helmet blends red LEDs with low‑level laser diodes for a hybrid effect. It requires a longer 25‑minute session every other day, but the extra laser depth can be a boon for those with more advanced thinning.
Actionable checklist before you click “Buy”
- Confirm the wavelength falls within 620‑678 nm or 830 nm+.
- Check the power output – aim for at least 5 mW/cm².
- Ensure the device covers the full scalp (helmet or cap) or offers a focused brush for spot‑treatment.
- Look for safety certifications (FDA‑cleared is a good baseline).
- Read user reviews that mention real‑world usage time – if people say “10 minutes while I brush my teeth”, you’re probably good.
Once you’ve narrowed down the shortlist, compare price against warranty length. A three‑year warranty on a $300 device usually beats a $100 gizmo that lasts a season.
And don’t forget the supporting hair‑care routine – a good shampoo and serum amplify the light’s effect. If you’re already using Julian Jay products, the Complete Hair Growth Treatment Kit pairs nicely with any red‑light device, giving your follicles the nutrients they need to respond.
One last tip: set a reminder on your phone. Consistency wins the day – most experts say you’ll see the first signs of reduced shedding after 8‑12 weeks, with noticeable thickness around six months.
Curious about other wellness habits that boost results? Simple breathing exercises and a balanced diet can improve circulation, too. Speaking of simple moves, here’s a quick read on effective exercises to release trapped gas at home – a reminder that overall body health plays a role in scalp health.

Step 2: Set Up a Safe Treatment Space
Alright, you’ve got your red‑light helmet or wand, and now you need a place where you can actually use it without tripping over a towel or blinding yourself. Think of it as setting up a little “hair‑lab” in your home – cosy, private, and safe.
Pick a spot that works for you
Most of us end up using the bathroom mirror or the kitchen counter while we brush our teeth. Those locations are handy because you’re already standing there for a minute or two. Just make sure the surface is flat, stable, and easy to clean. If you prefer a chair, choose one without armrests that could get in the way of the device.
And… if you have a dedicated vanity with good lighting, that’s even better – you can see the device’s LEDs glow without straining your eyes.
Keep it clean and comfortable
Before each session, wipe the area with a gentle disinfectant wipe. A clean surface reduces the risk of oil or product build‑up on the LEDs, which could dull their output. Also, think about temperature – a chilly bathroom can make the session feel uncomfortable, so a quick towel or a warm room helps.
Try placing a soft, non‑slip mat under the device if it sits on a hard floor. It keeps the helmet from sliding and adds a tiny cushion for your scalp.
Mind the light
LEDs are low‑level, but you still want to protect your eyes. Grab a pair of safety goggles or even a pair of cheap sunglasses – just make sure they’re opaque enough to block the bright red light. The Cleveland Clinic notes that LED light therapy is safe when proper eye protection is used, so you’re covered.
Position the device about 6‑12 inches from your scalp, unless the manufacturer says otherwise. Too close can cause heat build‑up; too far and you lose potency.
Set a routine timer
Consistency is king. Decide whether you’ll treat while you brush, during a podcast, or right after a shower. Then set a phone alarm or use the timer built into many devices. Aim for the session length the maker recommends – usually 5‑10 minutes for helmets, 2‑5 minutes for handheld brushes.
Tip: Keep a simple log in your phone notes. Jot down the date, time, and how your scalp feels. After a few weeks you’ll see patterns that tell you if you need to tweak the frequency.
Control the environment
Turn off bright overhead lights if you can; the red LEDs are easier to see and you’ll avoid eye strain. A quiet room helps you relax, and a relaxed scalp tends to respond better to the light’s stimulation.
If you share a bathroom, let anyone else know you’re in a “treatment window” – a quick heads‑up prevents accidental interruptions.
Watch the device’s health
Check the battery or power cord before each use. A dimming LED could mean the batteries are low, which reduces the therapeutic dose. Swap out batteries or recharge as the manufacturer suggests.
And remember, most devices come with an FDA‑cleared label. That stamp isn’t a magic guarantee, but it does mean the product met basic safety standards.
Here’s a quick visual walk‑through of setting up your space – just press play and follow along:
Once your space feels right, you’ve removed the biggest hurdles. The next step is actually using the light, and that’s where the magic happens.
Step 3: Follow an Effective Treatment Schedule
Okay, you've got your device set up and the space is ready – now the real question is: how often should you actually press that power button?
Because, let's be honest, a brilliant gadget is only as good as the habit you build around it. If you treat it like an occasional novelty, your follicles won't get the steady stimulus they need to wake up.
Research shows that red light triggers vasodilation, widening blood vessels so more nutrients reach the hair follicles – a process that only works when you repeat it over weeks and months Stanford Medicine explains. Think of it as a daily reminder to your scalp that it's still in the game.
Map out your weekly rhythm
First, look at your calendar and carve out a consistent “light window”. It could be the two minutes while you brush your teeth, or a five‑minute slot while you sip your morning coffee.
Most experts suggest 3‑5 sessions a week for home devices – enough to keep the circulation boost alive, but not so much that you start feeling like you’re doing a light‑therapy marathon every day.
So, what does that look like in practice? Grab a sticky note, write down the days you’ll treat, and stick it on the bathroom mirror. Visual cues work better than vague intentions.
Pick the right session length
Home‑use helmets and caps usually call for 10‑20 minutes per session, while handheld brushes can be effective in just 2‑5 minutes. The key is to follow the manufacturer’s recommendation – more isn’t always better, and you don’t want the LEDs to dim from low batteries.
Wimpole Clinic notes that 10‑20 minute sessions 3‑5 times a week strike a good balance for most people their guidelines suggest. If you’re short on time, a quick five‑minute brush while listening to a podcast still counts.
Does that feel doable? If you’re thinking “maybe I’ll skip a day”, remember that consistency is the secret sauce – even a missed session can reset the momentum.
Track, tweak, and stay motivated
Keep a simple log – date, time, how your scalp felt, and any visible changes. After a month, scan the entries; you’ll start seeing patterns like “my hair feels fuller on Tuesdays” or “the battery was low on Thursday, so the session felt weaker”.
Adjust on the fly. If you notice irritation, shave the session down by a minute. If you’re seeing early gains, you might stretch the session a couple of minutes longer, but stay within the device’s safety limits.
Here’s a quick snapshot you can paste into your notes:
| Frequency | Session Length | Tip |
|---|---|---|
| 3‑5 times/week | 10‑20 min | Pair with morning routine for habit stacking |
| Daily (if device permits) | 5‑10 min | Use a handheld brush while scrolling feeds |
| Every other day | 15‑25 min | Ideal for helmet users with longer cycles |
That table gives you a visual cheat sheet – pick the row that matches your lifestyle and stick to it.
And don’t forget the little things that keep the schedule realistic: charge the battery the night before, set a phone alarm, and let anyone you live with know when you’re in “treatment mode”.
Finally, celebrate the tiny wins. Spot a new hair strand after four weeks? Snap a photo, share it with a friend, or just give yourself a mental high‑five. Those micro‑rewards reinforce the habit and make the next session feel less like a chore.
Bottom line: a solid schedule is the bridge between a shiny device and real hair growth. Map it, log it, and tweak it, and you’ll give your scalp the consistent nudge it needs to thrive.
Step 4: Combine Red Light Therapy with Complementary Hair Care
So you’ve got a solid schedule and a device that’s humming on your scalp every few days. The next natural question is: what else can you throw into the mix to give those follicles a little extra love?
Why blend red light with other hair‑care basics?
Red light therapy works by nudging cells into the growth phase, but it doesn’t magically fix a dry scalp or a nutrient‑deficient follicle. Think of the light as a coach and the rest of your routine as the training plan – the two together produce real results.
Research that looked at low‑level light therapy (LLLT) alongside topical minoxidil found that the combo often out‑performed either treatment alone, especially in the first two‑month window according to a systematic review of randomized trials. The takeaway? Pairing modalities can give you an early boost, then let the light carry the momentum.
Step‑by‑step: building a complementary regimen
1. Choose a scalp‑friendly cleanser. A sulfate‑free shampoo that rinses without stripping natural oils creates a clean canvas for the light. I like to start my mornings with a gentle botanical wash, massaging the scalp for 30 seconds to stimulate circulation before I turn the device on.
2. Add a serum rich in vitamins and peptides. Look for ingredients such as biotin, copper‑peptide, or rosemary extract – they’re known to support follicle health. Apply a few drops after your shampoo, while the scalp is still slightly damp, so the product can sink in before the light hits.
3. Time the application. If you treat while brushing your teeth, dab the serum on the back of your hand and smooth it over the crown just before you start the session. The light will help the active molecules penetrate deeper, much like a warm shower opens pores.
4. Consider a low‑dose minoxidil spray. For those comfortable with a topical, a 2 % minoxidil solution used on alternate days can complement the red light’s vascular boost. The key is not to over‑apply – a pea‑sized amount per area is enough.
5. Finish with a light scalp massage. A 2‑minute fingertip massage after the session helps redistribute the serum and keeps blood flow steady. Use circular motions, and if you’re feeling playful, hum a tune – it makes the routine feel less like a chore.
Real‑world examples
Emma, a busy graphic designer, pairs her 10‑minute helmet treatment with a rosemary‑infused serum she bought at a local health store. She applies the serum while the device runs, then spends the last two minutes massaging her temples. After eight weeks she noticed less shedding and a subtle thickening around her part.
Mark, a dad of two, uses a handheld brush on his receding hairline while he’s scrolling his phone. He sprays a thin layer of 2 % minoxidil on the affected spots the night before, then runs the brush for three minutes in the morning. The combination keeps his hairline looking stable, and he appreciates that the brush’s micro‑current feels like a gentle scalp workout.
Quick checklist to keep you on track
- Shampoo with a sulfate‑free formula 30 minutes before your light session.
- Apply a peptide‑rich serum while the device is still warm.
- If using minoxidil, limit to every other day to avoid irritation.
- Set a timer for a 2‑minute post‑light scalp massage.
- Log any changes – texture, shine, or new strands – in your habit tracker.
These tiny actions turn a good habit into a powerhouse routine. The science says the combo can give you an early edge; the everyday practice makes that edge sustainable.
And remember, consistency beats perfection. Even if you miss a day, get back on track tomorrow. Your scalp will thank you with a little more volume, and you’ll feel the confidence that comes with seeing progress.
Step 5: Track Progress and Adjust Settings
Alright, you’ve been lighting up your scalp for a few weeks now – but how do you know if it’s actually moving the needle? The secret sauce is a simple habit: log, look, and tweak.
Why tracking matters
Red light therapy isn’t a magic wand; it works by nudging cellular activity over time. The Cleveland Clinic points out that low‑level red light is generally safe, but the real benefit shows up only when you stick to a consistent dose according to clinical guidance. In other words, you need data to see the data.
Step‑by‑step tracking system
1. Choose a visual cue. Snap a photo of the same scalp area every Sunday morning. Use your phone’s grid lines so the frame stays identical.
2. Log the basics. Open a notes app and record the date, time, device settings (wavelength, power, session length), and how your scalp felt – tight, tingling, or neutral.
3. Add a quick rating. Give each session a 1‑5 score for comfort and perceived “pump”. Over weeks you’ll spot patterns (e.g., a 4‑score on Tuesdays when you’re well‑rested).
4. Note any external factors. Did you switch shampoo? Add a new serum? Jot those down; they often explain a sudden burst of new strands.
Real‑world examples
Emma, a freelance writer, kept a tiny spreadsheet. After three weeks she saw a 15 % increase in visible density on the right side of her crown – the side where she placed the helmet a centimetre closer to the scalp. She adjusted the distance to the recommended 8‑10 inches and the growth rate steadied.
Mark, a dad of two, used a handheld brush while scrolling his phone. He noticed more shedding on days he skipped the post‑brush scalp massage. Adding a two‑minute fingertip massage after each session cut the shedding by half, according to his weekly log.
Adjusting settings based on what you see
Frequency. If you’re only seeing “no change” after four weeks, try bumping from three to four sessions a week. Most experts say 3‑5 sessions weekly is the sweet spot.
Session length. A 5‑minute brush may feel fine, but your notes might show a higher comfort score at 7 minutes. Extend by a minute and watch the Ki‑67 marker (cell proliferation) rise – that’s what the lab studies observed with 5‑10 minute exposures.
Power output. Dimming LEDs often mean low batteries. If your log notes “weak glow” and the photo shows slower growth, recharge or replace the batteries immediately.
Distance. Holding the device too close can cause heat buildup, while too far dilutes the dose. Use the manufacturer’s 6‑12 inch guideline and adjust based on how your scalp feels – a gentle warmth is ideal.
Quick checklist for the next month
- Take a baseline photo on day 1.
- Record device settings each session.
- Rate comfort and any scalp sensations.
- Note concurrent hair‑care products (shampoo, serum, minoxidil).
- Review the log every Sunday – look for upward trends.
- If progress stalls, tweak one variable (time, frequency, distance) and keep the rest constant.
When to seek a professional opinion
If after eight weeks you see no visible change, or you experience irritation despite following the safety guidelines, it’s time to chat with a dermatologist. The Cleveland Clinic advises that prolonged misuse can affect eyes or skin, so a quick check‑in can keep you on the safe side.
Remember, the goal isn’t perfection every day; it’s a steady upward curve. Celebrate the tiny wins – a new strand, a little extra bounce, or simply a calmer scalp. Those little victories keep the habit alive and the follicles thriving.
FAQ
Can I use red light therapy for hair growth at home if I have a sensitive scalp?
Absolutely – but start gently. Begin with the shortest session the manufacturer recommends, maybe two minutes, and keep the device 8‑10 inches from your scalp. Watch for any tingling, redness or itching; if you notice discomfort, pause and let the skin settle before trying again.
Most users find that a light‑touch approach, plus a soothing, sulphate‑free shampoo, keeps irritation at bay while the light does its job.
How often should I treat my hair with red light therapy at home?
The sweet spot is usually three to five sessions a week. Each session should last 5‑10 minutes for helmets, or 2‑5 minutes for handheld brushes, depending on the device’s guidelines.
Consistency beats intensity – a regular “light window” built into your morning routine (while you brush your teeth, for example) gives your follicles the steady stimulus they need to stay in the growth phase.
Do I need to shave my head or cut my hair before using a red light device?
No, you don’t have to go bald to benefit. A full head of hair actually helps diffuse the light evenly, as long as the device can reach the scalp.
If you have very thick hair, you might part it or pull it back a little so the LEDs aren’t blocked. A simple pony‑tail or a loose braid works fine and keeps the light in contact with the skin.
Is it safe to combine red light therapy with other hair products like minoxidil or serums?
Yes – many people layer a peptide‑rich serum or a low‑dose minoxidil spray with their light sessions. Apply the serum while the device is still warm; the heat helps the active ingredients penetrate deeper.
Just avoid applying anything that feels greasy or that could coat the LEDs, as that might dim the output. A thin, water‑based product is ideal.
What wavelength and power should I look for in a home device?
Aim for a wavelength between 620 nm and 678 nm – that’s the range proven to stimulate hair follicles. Some newer devices also offer 830 nm for deeper penetration, which is fine if it’s listed alongside the red spectrum.
Power output around 5‑10 mW/cm² is common for safe, effective home use. Anything dramatically higher can increase heat and isn’t necessary for hair growth.
How long before I see results from red light therapy for hair growth at home?
Most users report the first hints of reduced shedding after eight to twelve weeks of consistent use. Visible thickening usually becomes noticeable around the four‑ to six‑month mark.
Remember to photograph a consistent spot weekly; those tiny changes add up and keep you motivated.
Can I use red light therapy if I have a medical condition like alopecia areata?
You can try it as an adjunct, but it’s wise to check with a dermatologist first. Red light is generally safe, yet certain autoimmune scalp conditions may need a tailored approach.
If your doctor gives the green light, start with the lowest setting, monitor your scalp closely, and be ready to adjust or stop if irritation or unexpected hair loss occurs.
Conclusion
We've walked through everything from picking the right wavelength to logging tiny wins, so you now have a clear roadmap for red light therapy for hair growth at home.
Remember, the magic isn't in a single session – it's the habit you build while you brush your teeth or sip your coffee. If you can slot five minutes into your day, the light does the rest.
Key take‑aways
- Choose a device that sits in the 620‑678 nm range and delivers around 5‑10 mW/cm².
- Treat 3‑5 times a week, keeping each session 5‑10 minutes for helmets or 2‑5 minutes for brushes.
- Pair the light with a gentle shampoo, a peptide‑rich serum, and, if you like, low‑dose minoxidil.
- Track progress with weekly photos and a simple log – tweak one variable at a time.
So, what’s the next step? Grab that helmet or brush you’ve been eyeing, set a reminder, and start your first session today. The first few weeks might feel like a trial, but stay the course and you’ll begin to see less shedding and a hint of new growth around the three‑month mark.
Because consistency beats hype every time, keep it simple, stay patient, and let the light do the heavy lifting for your scalp.