
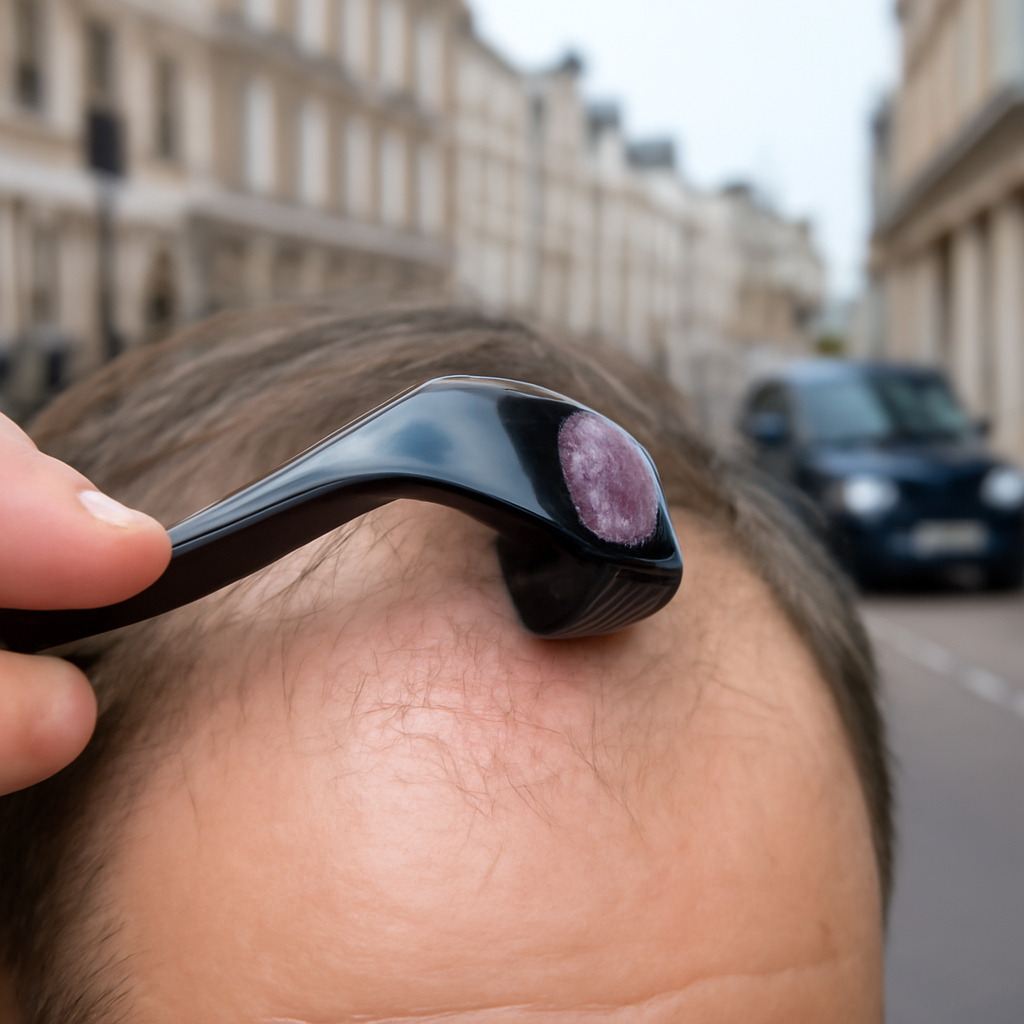
Ever stared at the mirror, run your fingers through a thinning patch, and wondered if there’s a tiny tool that could actually kick‑start new growth? You’re not alone – most of us over 30 have faced that uneasy moment when the scalp feels more like a desert than a garden.
What if I told you that the size of the needles on your derma roller can make the difference between a subtle boost and a noticeable transformation? In simple terms, the right needle length creates micro‑channels just deep enough to trigger collagen, boost blood flow, and awaken dormant follicles without causing unnecessary irritation.
Here’s the breakdown we’ve seen work best in real‑world settings:
- 0.25 mm: Ideal for beginners or those with sensitive scalps. It gently stimulates the surface, improves product absorption, and is safe to use two‑three times a week.
- 0.5 mm: The sweet spot for most men and women dealing with early‑stage thinning. It reaches the papillary dermis where hair follicles sit, promoting stronger regrowth when combined with active serums.
- 1.0 mm: Reserved for stubborn areas or advanced hair loss, but it requires professional guidance to avoid over‑trauma.
Imagine Sarah, a 42‑year‑old teacher, who started with a 0.25 mm roller while using our Active Scalp Cleanser. After four weeks she upgraded to 0.5 mm and reported visible thickening along her crown. Or Tom, a 35‑year‑old accountant, who jumped straight to 0.5 mm after a brief scalp assessment and saw new sprouts within two months.
Practical steps to get started:
- Choose the needle size that matches your scalp sensitivity and hair‑loss stage.
- Sanitise the roller with 70 % isopropyl alcohol before each use.
- Roll gently in four directions – up, down, left, right – for 5‑10 passes per zone.
- Follow immediately with a nourishing serum or Ketoconazole Shampoo for Hair Loss: Evidence‑Based Guide to maximise absorption.
- Maintain a consistent schedule: 2‑3 times weekly for 0.25 mm, once weekly for 0.5 mm.
Remember, the goal isn’t to over‑roll; it’s to create just enough micro‑injury to signal your body to repair. If you ever feel excessive redness or soreness, step back a session and let the scalp recover.
So, which needle length feels right for your journey? Start small, listen to your scalp, and watch the progress unfold – the best derma roller size for hair growth is the one that balances effectiveness with comfort.
TL;DR
The best derma roller size for hair growth provides enough micro‑injury to trigger collagen and wake dormant follicles without scalp irritation.
Combine it with a gentle scalp cleanser and a proven serum, use it 2‑3 times weekly, and you’ll see thicker, fuller strands appear regularly within a few weeks soon.
The Science Behind Microneedling and Hair Regrowth
Let me be honest: the idea of poking your scalp on purpose makes people nervous. But done right, microneedling is a targeted way to wake sleepy follicles and improve scalp health, especially if you're a man or woman over 30 noticing thinning.
At its simplest, microneedling uses tiny needles to make controlled micro‑injuries. Those micro‑injuries kickstart a wound‑healing cascade, collagen and elastin production ramps up, blood flow increases, and signalling molecules called growth factors turn on. Think of it as nudging the scalp’s repair mode so follicles get better support.
So, why does needle length matter?
Understanding the best derma roller size for hair growth helps you pick the right needle so you don't overdo it.
Depth equals different effects
Super short needles (0.25mm) mostly help product absorption and gentle surface stimulation. Move to 0.5mm and you reach the papillary dermis where hair follicles live, which is why many experts call 0.5mm the practical sweet spot for hair regrowth. At 1.0mm you’re causing deeper trauma, that can be useful in stubborn cases, but it needs care and less frequent sessions.
Does this really remodel follicles or just make your shampoo sink in better?
How microneedling helps hair specifically
There are three key mechanisms to understand. First, increased blood flow brings more oxygen and nutrients. Second, collagen and extracellular matrix remodelling create a healthier scaffold around follicles. Third, microneedling encourages release of growth factors like platelet‑derived and fibroblast growth factors, which help move follicles into the growth phase.
Put together, these changes create an environment where dormant or thin follicles have a better chance of producing thicker hair. In our experience, combining the right needle length with targeted serums consistently outperforms using either alone.
Quick practical checklist:
- Start with 0.25mm if your scalp is sensitive, using it 2–3 times a week.
- Progress to 0.5mm for most thinning hair cases, once weekly, allowing recovery between sessions.
- Reserve 1.0mm for persistent areas and consider professional supervision.
What about safety? Keep it simple: sanitise the roller, avoid active scalp infections, and don’t overdo frequency. If you’re using active topical treatments like minoxidil, space them thoughtfully, some find applying serum after microneedling improves absorption, but introduce changes slowly and watch for irritation.
For men and women over 30, the goal is steady stimulation, not trauma. Think consistency: small, measured sessions that signal repair. Julian Jay recommends matching needle length to your scalp sensitivity and following a simple routine, clean, roll, nourish, rest.
So, what should you do next? If you’re new, try 0.25mm with a gentle scalp cleanser. If you’ve been plateauing, consider 0.5mm and a proven serum. Listen to your scalp, adjust, and give it time, hair cycles are patient, but they reward consistent care.
Start small, document progress with photos every four weeks, and check in with a clinician if you see persistent irritation or no improvement after six months regularly.
Derma Roller Sizes Explained: Which Is Best for Your Hair Growth Goals
Ever wonder why the same roller that works for a friend’s beard looks a bit intimidating on your own scalp? It’s all about the needle length – the tiny ruler that decides how deep the micro‑injury goes and how your follicles respond.
Let’s break it down together. Think of your scalp as a three‑layer cake: the thin epidermis on top, the thicker dermis where the hair‑bulb lives, and the deeper sub‑cutis. The needle has to reach the right layer without over‑cooking the cake.
0.25 mm – The “Gentle Intro”
This size barely scratches the epidermis. It’s perfect if you’re new to microneedling or have a very sensitive scalp. The main benefit? It creates micro‑channels that dramatically improve the absorption of any serum you apply afterwards – think of it as opening a door for active ingredients.
Because the trauma is minimal, you can safely use it 2‑3 times a week. Most people notice quicker relief from itching and a subtle boost in product efficacy, but you won’t see the deep‑tissue growth factors that larger needles trigger.
0.5 mm – The “Sweet Spot” for Early‑Stage Thinning
At half a millimetre the needles reach the papillary dermis, right where the hair‑bulb sits. That’s the zone that houses the stem‑cell bulge responsible for starting a new anagen (growth) phase. In our experience, most men and women over 30 who are dealing with the first signs of thinning find this length gives the best balance of comfort and results.
Roll once a week, keep the pressure light, and follow up instantly with a growth‑promoting serum – for instance, the routine we outline in our Microneedling for Hair Loss at Home: A Practical How‑To Guide. Users often report visible thickening after 4‑6 weeks.
1.0 mm and Above – The “Professional‑Grade” Zone
Going beyond 0.5 mm pushes the needles into the deeper dermis and even the sub‑cutis. Research from Perfect Hair Health shows that lengths between 0.6 mm and 2.5 mm can improve hair counts by roughly 15 % when used once weekly or bi‑weekly, but the risk of redness, pinpoint bleeding, and longer downtime also climbs.
Because rollers typically penetrate only about 70 % of their stated length, a 1.0 mm roller may feel more like a 0.7 mm punch. That’s why many clinicians advise a 1.5 mm‑2.0 mm pen (not a roller) for stubborn, advanced loss – and only under professional supervision.
How to Choose the Right Size for You
Ask yourself three quick questions:
- Is my scalp sensitive or prone to irritation?
- What stage of thinning am I in (early, moderate, advanced)?
- Can I commit to a consistent schedule without over‑rolling?
If you answered “yes” to sensitivity or you’re just starting, stick with 0.25 mm. If you’re in the early‑stage thinning zone and can wait a week between sessions, 0.5 mm is your go‑to. For persistent patches that haven’t responded after three months, consider a professional‑grade 1.5 mm‑2.0 mm pen – but only after a scalp assessment.
Quick‑Start Checklist
- Sanitise your roller with 70 % isopropyl alcohol for 5 minutes.
- Section your scalp into four quadrants.
- Roll each quadrant 5‑10 times in each direction (up, down, left, right).
- Pause for 60 seconds – let the micro‑injury settle.
- Massage your favourite growth serum into the fresh channels.
- Log your sessions and any redness; adjust frequency if needed.
Consistency is the secret sauce. Even the best needle won’t work if you skip weeks.
Needle‑Size Comparison Table
| Needle Length | Depth Reached | Typical Use Frequency | Best For |
|---|---|---|---|
| 0.25 mm | Epidermis (surface) | 2‑3×/week | Beginners, sensitive scalp, serum absorption |
| 0.5 mm | Papillary dermis (hair‑bulb zone) | 1×/week | Early‑stage thinning, most adults 30+ |
| 1.0 mm – 2.0 mm | Deep dermis / sub‑cutis | 1×/2‑weeks (pen) or under professional guidance | Advanced loss, stubborn patches |
Bottom line: there isn’t a one‑size‑fits‑all needle, but the 0.5 mm roller is the most commonly recommended “best derma roller size for hair growth” for people in their 30s and 40s dealing with early‑stage thinning. Pair it with a good serum, keep your schedule steady, and you’ll start to see the hair‑line‑filling results you’re hoping for.
Step‑by‑Step Guide to Using a Derma Roller for Hair Growth
1. Prep the tool and your scalp
First thing’s first – you don’t want any unwanted microbes joining the party. Pop the roller into a cup of 70 % isopropyl alcohol for about five minutes, then set it on a clean towel to air‑dry. While that’s happening, give your hair a gentle wash with a mild shampoo and pat it dry. A clean, slightly damp scalp lets the needles glide more smoothly and reduces friction.
Do you ever wonder why some people skip this step and end up with irritation? It’s usually the culprit.
2. Section the scalp
Imagine you’re painting a wall – you’d tape off sections to make sure you cover every inch, right? Do the same with your scalp. Part your hair into four quadrants (left‑front, right‑front, left‑back, right‑back) using a wide‑tooth comb. This visual map helps you track where you’ve rolled and prevents double‑rolling a spot, which can cause excess redness.
3. Choose the right needle length for the session
If you’re just starting out or have a sensitive scalp, stick with the 0.25 mm roller for this first round. More experienced users dealing with early‑stage thinning usually opt for the 0.5 mm size. Remember, the “best derma roller size for hair growth” isn’t a one‑size‑fits‑all – it’s the size that matches your comfort level and hair‑loss stage.
4. Rolling technique – direction and passes
Grab the roller, hold it lightly (think a feather, not a hammer), and roll in one direction across a quadrant – up, then down, then left‑to‑right, then diagonal. Aim for 5‑10 passes per direction. The goal is to create micro‑channels without digging too deep. You’ll notice a faint pink hue; that’s healthy erythema, a sign the skin is waking up.
Pro tip: set a timer for 60 seconds per quadrant. It keeps you consistent and stops you from over‑rolling.
5. Pause and let the micro‑injury settle
Once you’ve covered a quadrant, step back and let the scalp rest for about a minute. This brief pause lets the tiny channels begin to close, creating a perfect gateway for your serum.
6. Apply a growth‑boosting serum
Now comes the fun part – the serum sees the most benefit. Pick a product that contains peptides, niacinamide, or botanical extracts. Massage it in with gentle circular motions; the micro‑channels act like tiny doors, ushering the actives straight to the follicle niche.
For a deeper dive on how to pair serums with microneedling, check out our guide on how to improve blood circulation in the scalp. Good blood flow means the nutrients you just applied get delivered faster.
7. Clean and store your roller
After each session, give the roller another quick dip in alcohol, shake off excess, and let it dry completely before slipping it back into its case. A tidy tool lasts longer and stays hygienic.
8. Log your experience
Grab a small notebook or a notes app and jot down the date, needle length, any redness, and how your scalp feels. Over weeks, you’ll spot patterns – maybe you need a longer rest between sessions or a slightly larger needle.
Real‑world example: Emma, a 38‑year‑old graphic designer, started with a 0.25 mm roller twice a week. After four weeks she noticed less shedding, so she upgraded to 0.5 mm once a week. By week eight she reported visible thickening along her crown. The key was logging her sessions and adjusting frequency based on how her scalp reacted.
9. Frequency – the secret sauce
Consistency beats intensity. For 0.25 mm, aim for 2‑3 sessions per week. For 0.5 mm, once a week is enough. Give the skin 48‑72 hours to complete its repair cycle before the next roll. Over‑rolling can prolong inflammation and actually set back progress.
10. When to pause
If you see more than a mild pinkness, a burning sensation, or pinpoint bleeding, skip the next session. Let the scalp recover fully – usually a couple of days – before you resume.
That’s the full routine, boiled down to ten easy steps. Follow them, stay patient, and you’ll start to see the hair‑line‑filling results you’ve been hoping for.
Integrating Derma Rolling into a Complete Scalp Care Routine
So you’ve got the right needle length – now how do you slot the roller into a day‑to‑day scalp regimen without turning it into a chore? Think of it like building a breakfast that fuels you for the whole day. You need the right ingredients, the right timing, and a little bit of patience.
Layer 1: Clean, Calm, Ready
Start with a gentle scalp cleanse. A mild, sulphate‑free shampoo removes excess sebum and dead skin, letting the micro‑channels stay open longer. If you’re already using our Active Scalp Cleanser, roll a few minutes after the rinse while your scalp is still slightly damp – the moisture helps the needles glide and reduces friction.
For those who want an extra boost, a quick scalp exfoliation can sweep away stubborn build‑up. Our guide on scalp exfoliation for hair growth explains how a once‑a‑week scrub pairs perfectly with microneedling, especially before a 0.5 mm session.
Layer 2: The Microneedling Moment
Sanitise the roller (70 % isopropyl alcohol, 5 minutes). Section the scalp into four quadrants – think of it as dividing a pizza so you don’t miss a slice. Roll each quadrant 5‑10 times in four directions (up, down, left, right). Keep the pressure light; you want a faint pink flush, not a raw burn.
After you finish, give the scalp a minute to settle. That pause lets the tiny channels start to close, creating a perfect doorway for the next layer of actives.
Layer 3: Serum Super‑Charge
Here’s where the magic really happens. Choose a serum rich in peptides, niacinamide, or botanical extracts – anything that talks to the hair follicle’s stem cells. Massage it in with circular motions; the micro‑channels act like a delivery‑system, shuttling the actives straight to the bulb.
If you’re wondering whether a shampoo can double as a post‑roll serum, the short answer is no. Shampoos are designed to rinse away, whereas serums stay put. Stick to a dedicated growth serum for the best results.
Layer 4: Seal the Deal with Moisture
Finish with a light, non‑comedogenic scalp oil or a leave‑in conditioner. The oil forms a protective barrier, locking in the serum’s nutrients and preventing any overnight dryness. It also adds a soothing element that can calm the mild erythema you see after rolling.
Timing & Frequency – The Calendar You’ll Actually Follow
For 0.25 mm rollers, aim for 2‑3 sessions per week, spaced 48‑72 hours apart. For 0.5 mm, once a week is enough – your scalp needs a full repair cycle before you punch it again. If you notice more than a light pinkness, a tingling sensation, or tiny spots of bleeding, skip the next session and let the skin recover.
Real‑world example: James, a 45‑year‑old accountant, paired a weekly 0.5 mm roll with a peptide serum and a gentle exfoliation every fourth week. After six weeks he reported less shedding and a subtle thickening at the crown. His secret? Logging every session in a simple spreadsheet and adjusting the frequency when his scalp felt “too hot”.
Putting It All Together – A Quick‑Start Checklist
- Sanitise roller (70 % isopropyl alcohol, 5 min).
- Wash scalp with a mild, sulfate‑free shampoo.
- Optional: perform a gentle scalp exfoliation (once a week).
- Section scalp into four quadrants.
- Roll each quadrant 5‑10 times in four directions.
- Pause 60 seconds.
- Apply a peptide‑rich growth serum.
- Seal with a light scalp oil or leave‑in conditioner.
- Log the session, note any redness or irritation.
When you follow this layered routine, the derma roller becomes the catalyst, not the whole story. Your scalp health, product selection, and consistency are the real stars.
Looking for a complementary wellness boost? Some users find that frequency‑based devices, like the Healy Frequency Device, can improve cellular metabolism and circulation, which may further support the micro‑injury response from microneedling. Always check with a healthcare professional before adding new tech to your regimen.
Choosing the Right Derma Roller Size for Your Scalp Type
Ever looked at the tiny needles on a derma roller and thought, "Which one won't turn my scalp into a war zone?" You’re not alone. The needle length you pick is the first decision that determines whether you’ll see a subtle boost or a full‑on regrowth sprint.
First, listen to your scalp. If it feels like a delicate newborn carpet – itching after a gentle wash, reddening with a light touch – you’re dealing with a sensitive scalp. In that case, the 0.25 mm roller is your safest bet. It creates micro‑channels just deep enough to improve serum absorption without provoking noticeable inflammation.
On the other hand, if you’ve already tried a 0.25 mm roller and notice only a slight improvement in product uptake, it may be time to graduate. The 0.5 mm size reaches the papillary dermis, where the hair‑bulb lives, and triggers a stronger wound‑healing response. This is the sweet spot for most men and women over 30 who are in the early‑stage thinning phase.
But what about those with very oily scalps or an active sebaceous zone? Excess oil can block the tiny pores created by a 0.25 mm needle, meaning the micro‑injury never translates into a growth signal. For oily scalps, a short‑term switch to 0.5 mm – combined with a thorough cleansing routine – often yields better results.
Real‑world examples that illustrate the decision‑tree
Take Claire, a 39‑year‑old graphic designer from Manchester. She started with a 0.25 mm roller twice a week because her scalp was prone to irritation. After six weeks she saw smoother skin but no noticeable thickening. She moved up to 0.5 mm, kept the frequency to once a week, and within another month reported a visible reduction in shedding at the crown.
Then there’s Paul, a 48‑year‑old accountant with a dry, flaky scalp. He began with a 0.5 mm roller straight away, but his dermatologist warned him to back‑off after a week of mild redness. He reverted to 0.25 mm for two weeks, added a gentle scalp exfoliation, and only then re‑introduced the 0.5 mm roller at a lower pressure. The lesson? Even the “right” size can feel too aggressive if you skip the prep steps.
Step‑by‑step sizing checklist
- Assess scalp sensitivity – look for redness, itching, or a history of eczema.
- Identify hair‑loss stage – early (thin‑looking density), moderate (visible thinning patches), or advanced (significant baldness).
- Match needle length:
- 0.25 mm – Sensitive scalp or beginner, 2‑3 times a week.
- 0.5 mm – Early‑stage thinning, once a week.
- 0.6‑1.0 mm – Advanced loss, only under professional supervision.
- Do a patch test – roll a small area for 5 passes, wait 48 hours, and check for prolonged irritation.
- Log the outcome – note needle length, frequency, any redness, and hair‑density changes.
Logging is crucial; it turns guesswork into data you can act on. In our experience, users who keep a simple spreadsheet see faster optimisation because they can spot patterns – like “my scalp feels hot on Tuesdays, so I shift the session to Thursday”.
Complementary habits that boost the right size
Even the perfect needle won’t work in isolation. Pair your chosen roller with a scalp‑cleansing routine that removes excess sebum, and follow up with a peptide‑rich growth serum. If you’re curious about how a scalp‑massage can further improve circulation, check out our guide on does scalp massage help hair growth. The gentle massage primes the follicles, making the micro‑channels you create even more receptive.
And remember, overall wellness matters. A balanced diet, adequate sleep, and low stress levels create a fertile environment for new hair. For a holistic boost, many of our readers add a daily probiotic or omega‑3 supplement from XLR8well, which supports systemic inflammation control – a subtle yet important factor for scalp health. XLR8well offers a range of health programmes that complement a hair‑growth regimen.

Bottom line: there isn’t a magic “one‑size‑fits‑all” needle, but by matching your scalp’s sensitivity and hair‑loss stage to the appropriate length, you set the stage for consistent, measurable progress. Start small, observe, adjust, and let the micro‑injury do its quiet work.
FAQ
What is the best derma roller size for hair growth if I’m just starting out?
For most beginners the 0.25 mm roller is the sweet spot. It creates tiny channels that boost product absorption without triggering noticeable irritation. You can safely roll 2‑3 times a week, letting your scalp recover between sessions. Because the needles only graze the surface, you’ll feel a faint pink flush rather than a raw burn – perfect for testing your tolerance before moving up.
Can I use a 0.5 mm roller if my scalp is sensitive?
Yes, but take it slow. Start with just a few passes in one quadrant and see how your skin reacts after 48 hours. If you only notice a mild pinkness, you’re likely fine to continue once a week. The 0.5 mm length reaches the papillary dermis, which is where the hair‑bulb lives, so it delivers a stronger stimulus – just don’t over‑press.
How often should I roll to see results without causing damage?
Consistency beats intensity. For a 0.25 mm roller aim for 2‑3 sessions per week; for a 0.5 mm roller, once a week is enough. Give your scalp 48‑72 hours to complete its repair cycle before the next roll. This timing lets collagen and growth factors do their work while keeping inflammation low, which is key to sustainable regrowth.
Do I need to pair the roller with a serum, and why?
Pairing is practically mandatory if you want the best derma roller size for hair growth to shine. The micro‑channels act like tiny doors, letting actives such as peptides, niacinamide or botanical extracts sink straight to the follicle niche. Apply the serum immediately after rolling while the channels are still open; the result is a boost in nutrient delivery and faster visible thickening.
Is microneedling safe for women dealing with hormonal hair loss?
Absolutely, as long as you respect your scalp’s tolerance. Hormonal thinning often shows up as diffuse shedding, which responds well to the gentle stimulation of a 0.25 mm roller or the deeper reach of a 0.5 mm roller if you’ve already built tolerance. Combine the treatment with a balanced diet and, if needed, a hormone‑friendly supplement – the roller simply amplifies the scalp’s natural repair signals.
What signs tell me I’m over‑rolling my scalp?
If you notice prolonged redness lasting more than a day, a burning sensation, pinpoint bleeding, or persistent soreness, you’re probably over‑doing it. Scale back to half the usual passes or extend the gap between sessions to three days. Remember, the goal is a light pink flush, not a sunburned scalp – less is often more when you’re chasing the best derma roller size for hair growth.
How long before I can expect real hair regrowth?
Most people see the first signs of reduced shedding within three to four weeks, but visible thickening usually takes 8‑12 weeks of consistent rolling. Patience is essential; the micro‑injury sparks a cascade of growth factors that need time to translate into new shafts. Track your progress with photos every two weeks – the gradual change is the proof that you’ve chosen the right needle length.
Conclusion & Next Steps
We’ve walked through the science, the sizes, and the day‑to‑day routine – so let’s bring it all together.
If you’re over 30 and your scalp feels a bit thin, the best derma roller size for hair growth is usually the 0.5 mm needle. It reaches the papillary dermis where the hair bulb lives, giving you a stronger wound‑healing signal without the irritation that larger needles can cause. For absolute beginners or very sensitive scalps, start with 0.25 mm and upgrade once you see that gentle pink flush and no lingering redness.
So, what’s the next step? Grab a clean roller, sanitise it in 70 % isopropyl alcohol, and set a simple schedule – 2‑3 times a week for 0.25 mm or once a week for 0.5 mm. Mark the day in your phone, log any colour change, and pair the session with a peptide‑rich serum.
Remember to listen to your scalp: a light pink hue that fades within an hour is the sweet spot; prolonged burning or pinpoint bleeding means you need more recovery time. Adjust frequency or needle length accordingly.
Finally, give yourself eight to twelve weeks before expecting a noticeable thickening. Take photos every two weeks, note the differences, and stay consistent – that’s the real magic behind the best derma roller size for hair growth.
Product Recommendations: Top Derma Rollers and Complementary Hair Care Products
Alright, you’ve sorted the needle length – now let’s talk about the actual roller you’ll be holding in your hand. If you’re still wondering whether a 0.25 mm or a 0.5 mm tool is worth the investment, you’re not alone. In a recent Glamour roundup of the best derma rollers for hair growth, dermatologists and everyday users alike highlighted a few stand‑outs that work nicely with the routines we’ve already covered.
Derma rollers that have earned our trust
- Vegamour 0.25 mm GRO+ Advanced Scalp Roller – perfect for beginners or anyone with a sensitive scalp. The wider head lets you cover more area in fewer passes, and the gold‑plated titanium needles stay sharp for months.
- iRestore ScalpStim 0.5 mm Roller – the sweet spot for most men and women over 30 dealing with early‑stage thinning. Its palm‑friendly handle gives you steady pressure, and the 0.5 mm needles reach the papillary dermis where the hair bulb lives.
- Titanium linear‑needle roller (generic brand) – if you prefer a tool that feels a little more precise, look for one with individual titanium needles rather than a dense disk. This design reduces scalp irritation and keeps the micro‑channels clean.
Why does the iRestore 0.5 mm model often get the nod? Because it delivers just enough trauma to spark collagen production without the downtime you’d see with longer, professional‑grade pens. Pair it with a once‑a‑week schedule and you’ll hit that light pink flush we’ve talked about earlier.
What to look for when choosing a roller
- Needle material – titanium or surgical‑grade stainless steel lasts longer and resists dulling.
- Head size – a 12‑15 mm head speeds up coverage; a smaller head gives you more control around the hairline.
- Ergonomic grip – a palm‑sized handle reduces hand fatigue during the 5‑minute session.
- Replaceable cartridge – ideal for hygiene; swap the head every 30 days.
Keep these points in mind, and you’ll avoid the common pitfall of buying a cheap roller that blunts after a few weeks, leaving you frustrated and your scalp irritated.
Complementary hair‑care products to maximise results
Even the best roller is only half the story. After you roll, you want actives that can slip straight through those fresh micro‑channels. Here are the three product types we consistently recommend:
- Peptide‑rich growth serum – peptides signal the follicle to stay in the anagen phase. Apply while the scalp is still warm from the micro‑injury.
- Ketoconazole shampoo or a scalp‑cleansing conditioner – keeps the pores clear of excess sebum and reduces inflammation, giving the serum a clean runway.
- Lightweight hair‑growth oil – a few drops of a non‑comedogenic oil seals in moisture and soothes the mild erythema you see after rolling.
So, what should you add to your cart today? If you’re just starting, grab the Vegamour 0.25 mm roller, a peptide serum, and a gentle ketoconazole shampoo. If you’re ready to level up, the iRestore 0.5 mm roller paired with the same serum and a scalp‑cleansing conditioner will give you the most bang for your buck.
Remember, consistency is the real magic. Stick to the schedule, log your sessions, and watch those tiny pink dots turn into thicker strands over the next eight to twelve weeks.